PMS - Cashier User Guide
1. Overview
This PMS – Cashier User Guide provides hotel staff and system users with clear, step-by-step instructions on how to manage and utilize the features available in the Cashier menu. It is designed to support daily cashier operations, including billing guests, processing payments, adjusting transactions, and generating financial reports. The Room List displays rooms currently occupied by guests, while the Folio History shows all folios from checked-out rooms. The Cashier Audit function is used by staff to close their shift, and the Cashier Audit History provides a record of past audits. The Monthly List is used to view and manage guests with monthly bookings, and the Return Deposit section tracks deposits that have been returned by staff.
2. Search & Filters
Available under Cashier > Room List , this function allows staff to search and filter guest information efficiently. You can search using various criteria such as guest name, room number, folio number, or other related details to quickly locate the desired reservation or transaction.
To perform the task:
- Press Filter to open the Search & Filter function.
- Enter the information or select some options for searching:
- Search : Allows you to search by room number, booking number, guest name, etc.
- Arrival / Due Date : Select whether to filter by Arrival Date or Due Date.
- From / To : Specify the date range to search within.
- Building : Select the building.
- Booking Type : Type of booking (e.g., Walk-in, OTA, Direct).
- Guest Name : Guest's full name.
- Company : Company name (if booked under a corporate account).
- Agent : Booking agent or intermediary.
- Source : Source of the booking (e.g., Website, Agoda).
- Booking No.: Booking reference number.
- Rate Code : Rate plan code.
- Mobile No. : Guest or booker's phone number.
- Nationality : Guest's nationality.
- VIP Type : VIP level (if applicable).
- Transfer Service : (None / Pickup / Drop off). If you select Pickup, it will show the Pickup Type, Pickup Date, and Pickup Time. If you select Drop off, it will show the Drop off Type, Drop off Date, and Drop off Time to select.
- Room Type Original : The originally booked room type.
- Non-Group / Group / Both : You can select to search and filter by Group, Non-Group, or both.
- Group Info : Search by group name or tour group.
- Party Info : Search by subgroup within a group.
- Press Search to search for the information you selected or entered.
- Press Reset to clear all the fields that you selected or entered.
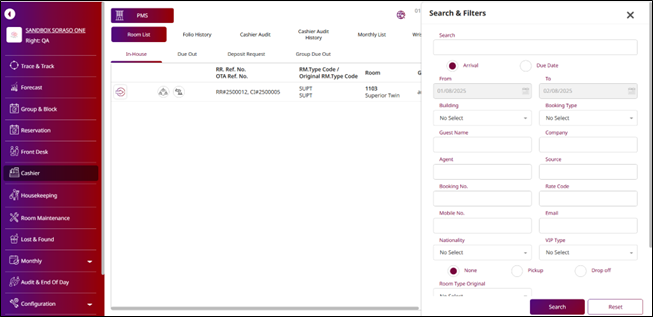
Note: You don't have to enter or select all the fields. Only choose the ones that are necessary for your search.
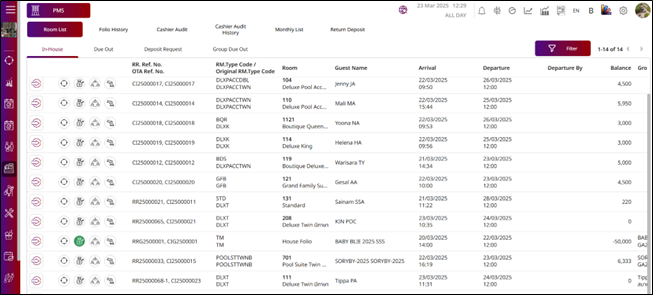
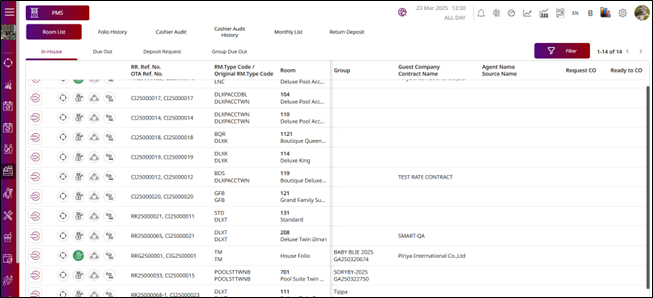
3. Check Room In-House
Available under Cashier > Room List , this function allows staff to view, manage, and search for rooms that are currently occupied by guests (in-house). It displays only rooms with active stays, helping staff efficiently monitor ongoing reservations and manage in-house guest billing. By clicking Select & Go, the system will open the Cashier display, where staff can post charges, process payments, cancel transactions, or manage the guest folio.
- Reference No. / OTA No. : The booking reference number or OTA (Online Travel Agency) confirmation number.
- Room Type Code : The code representing the type/category of room.
- Room Number : The assigned room number for the guest.
- Arrival Date : The date the guest checked in.
- Departure Date : The scheduled check-out date (must be today).
- Departure By : Name of the user or staff responsible for managing the check-out.
- Balance : Any remaining balance or amount due for the guest's stay.
- Group : Indicates if the booking is part of a group reservation.
- Guest Company / Contract Name : The associated company or contract, if applicable.
- Agent Name / Source Name : The travel agent or booking source.
- Request Check-Out : Indicates whether the guest has requested check-out.
- Ready to Check-Out : Status showing if the room is ready for the check-out process.
4. Check Room Due Out
Available under Cashier > Room List > Due Out , function allows staff to view, manage, and search for rooms scheduled to check out on the current day. The Due Out tab displays only rooms with a departure date matching today's date, helping staff efficiently prepare for guest check-outs and complete billing or folio reviews in advance. By clicking Select & Go, the system opens the Cashier display, where staff can post charges, process payments, cancel transactions, manage the guest folio, and proceed with checking out the room.
- Reference No. / OTA No. : The booking reference number or OTA (Online Travel Agency) confirmation number.
- Room Type Code : The code representing the type/category of room.
- Room Number : The assigned room number for the guest.
- Arrival Date : The date the guest checked in.
- Departure Date : The scheduled check-out date (must be today).
- Departure By : Name of the user or staff responsible for managing the check-out.
- Balance : Any remaining balance or amount due for the guest's stay.
- Group : Indicates if the booking is part of a group reservation.
- Guest Company / Contract Name : The associated company or contract, if applicable.
- Agent Name / Source Name : The travel agent or booking source.
- Request Check-Out : Indicates whether the guest has requested check-out.
- Ready to Check-Out : Status showing if the room is ready for the check-out process.
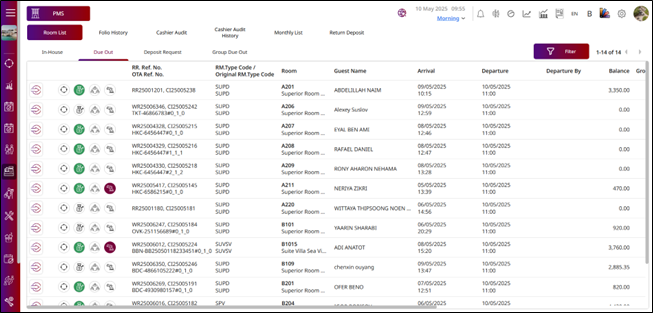
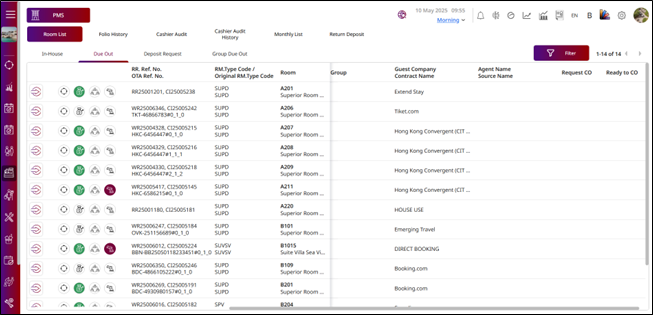
Note: This page is for checking rooms due out. If you want to manage a room, you can press the Select & Go button to navigate to the folio of that room.
5. Check Deposit Request
Available under Cashier > Room List > Deposit Request , this function allows staff to view, manage, and search for rooms with deposit requests. It displays a list of bookings with either pending or recorded deposit transactions, helping staff monitor payment status, follow up with guests, and manage financial records efficiently. By clicking Select & Go, the system opens the Cashier display; however, when accessed from the Deposit Request section, the cashier page is limited to posting or processing deposit payments only.
Deposit Status Icons
- Dark Red (Second Red) Money Bag Icon : Indicates that a deposit request has been generated from the reservation, but the deposit has not yet been collected.
- Green Money Bag Icon : Indicates that the deposit has been successfully received.
- Red Money Bag Icon : Indicates that the deposit collection has been canceled or voided.
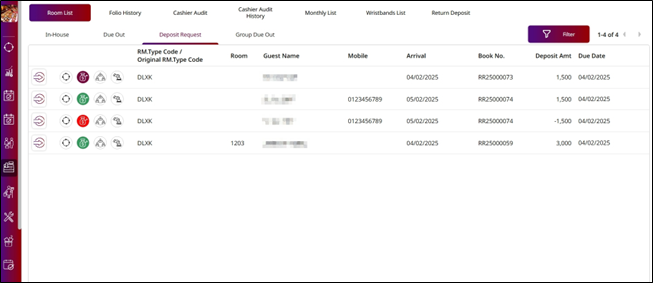
Note: The Search & Filter section shown above allows you to search deposit requests using keywords, arrival or due date, and status filters. The search results will also display the deposit status (e.g., requested, paid, canceled) for each booking.
6. Check Group Due Out
Available under Cashier > Room List > Group Due Out , this function allows staff to view, manage, and search for group bookings with rooms scheduled to check out on the current day. It helps staff efficiently track group departures, coordinate billing, and ensure a smooth and organized check-out process for all guests within the group. The information displayed on this page is the same as in the Check Room Due Out section, with the key difference being that it displays only rooms that are part of a group reservation. By clicking Select & Go, the system opens the Cashier display; however, when accessed from the Group Due Out section, the cashier page is limited to performing room check-out only.
- Reference No. / OTA No. : The booking reference number or OTA (Online Travel Agency) confirmation number.
- Room Type Code : The code representing the type/category of room.
- Room Number : The assigned room number for the guest.
- Arrival Date : The date the guest checked in.
- Departure Date : The scheduled check-out date (must be today).
- Departure By : Name of the user or staff responsible for managing the check-out.
- Balance : Any remaining balance or amount due for the guest's stay.
- Group : Indicates if the booking is part of a group reservation.
- Guest Company / Contract Name : The associated company or contract, if applicable.
- Agent Name / Source Name : The travel agent or booking source.
- Request Check-Out : Indicates whether the guest has requested check-out.
- Ready to Check-Out : Status showing if the room is ready for the check-out process.
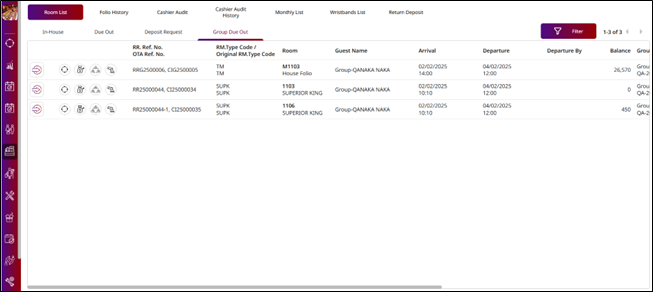
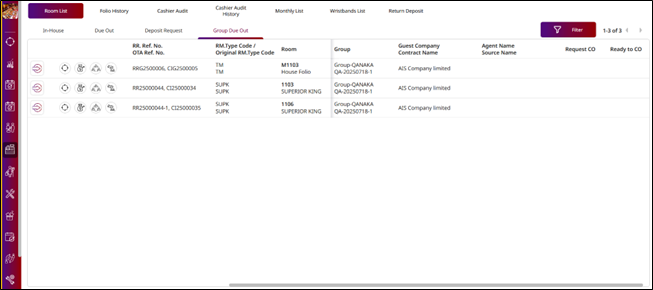
Note: This section displays only group bookings due to check out today, helping staff manage grou departures efficiently.
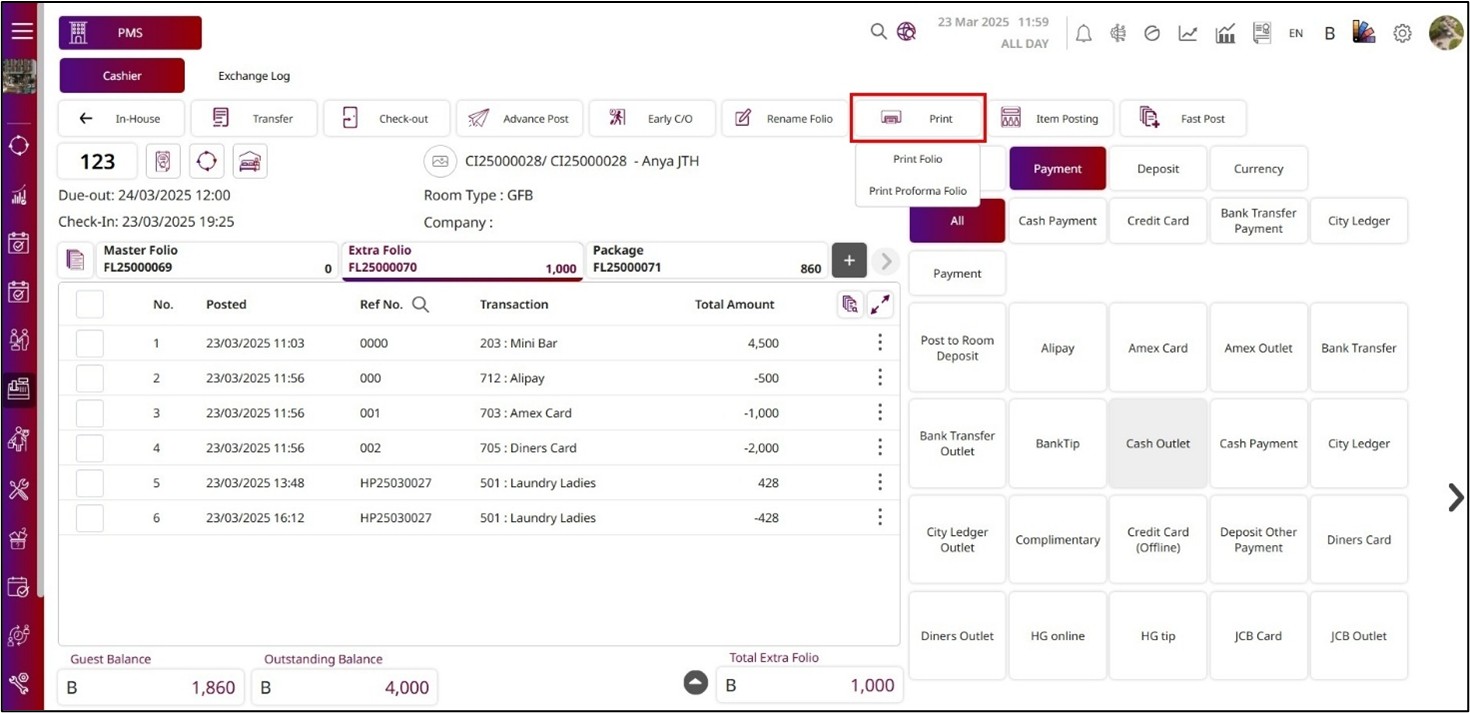
7. Cashier Page
Available under Cashier > Room List > In-House or Due Out tabs by clicking the Select & Go button, this function opens the Cashier screen. It allows staff to view and manage various cashier-related tasks, including posting transactions, processing payments, renaming folios, and handling guest check-outs.
7 .1 Add New Folio
This function allows staff to create a new folio when needed. However, under normal operations, the system automatically generates both a Master Folio and an Extra Folio by default upon check-in.
To perform the task:
-
Press the + button.
-
The New Folio will display on the right side.
-
Select the Folio Type.
-
Enter the Folio Name.
-
Enable the Show on GSA toggle if you want this folio to show on the SORASO GSA Application.
-
Enable the Show on Online toggle if you want this folio to show online.
-
Select a radio button for Allow Charge to set this folio for charging to the room or select the Disallow Charge radio button to prevent charging to the room.
-
Press Save to create the folio.
Press Cancel to discard the process.
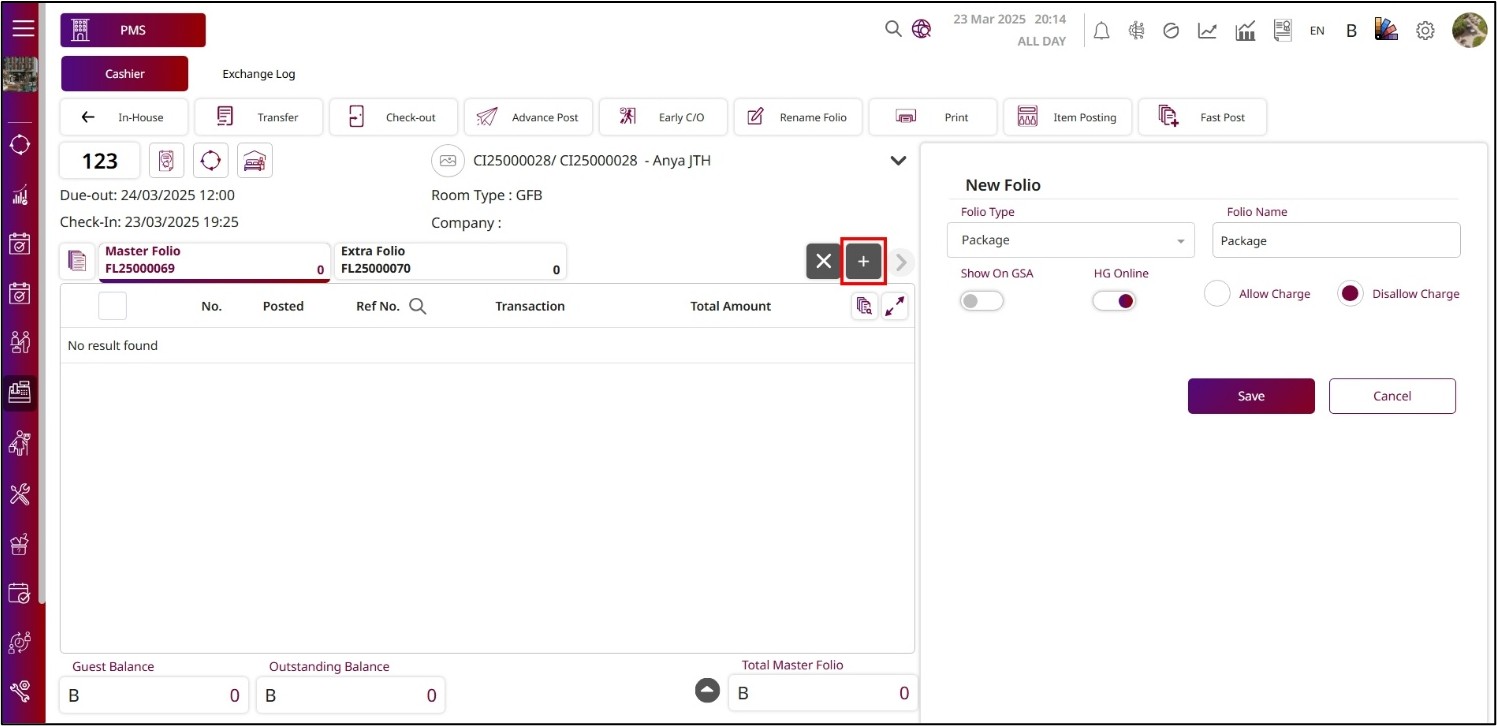
Note: Folio creation is optional; the system will automatically generate the Master and Extra folios during check-in. You can create additional folios as needed.
7. 2 Rename Folio
This function allows staff to rename and manage the names of all folios associated with a room, helping to better organize and clearly identify each folio. To use this function, staff can click the Rename Folio option from the top menu bar within the Cashier page.
To perform the task:
- Press Rename Folio from the top menu bar.
- The Rename option will display on the right side.
- The system will show all the folios for this room.
- Folio No. : This field cannot be edited, but it will display the Folio No.
- Folio Name : This field is editable. You can enter a new name or edit the existing Folio Name.
- Press Save to save the new folio name.
- Press Cancel to discard the process.
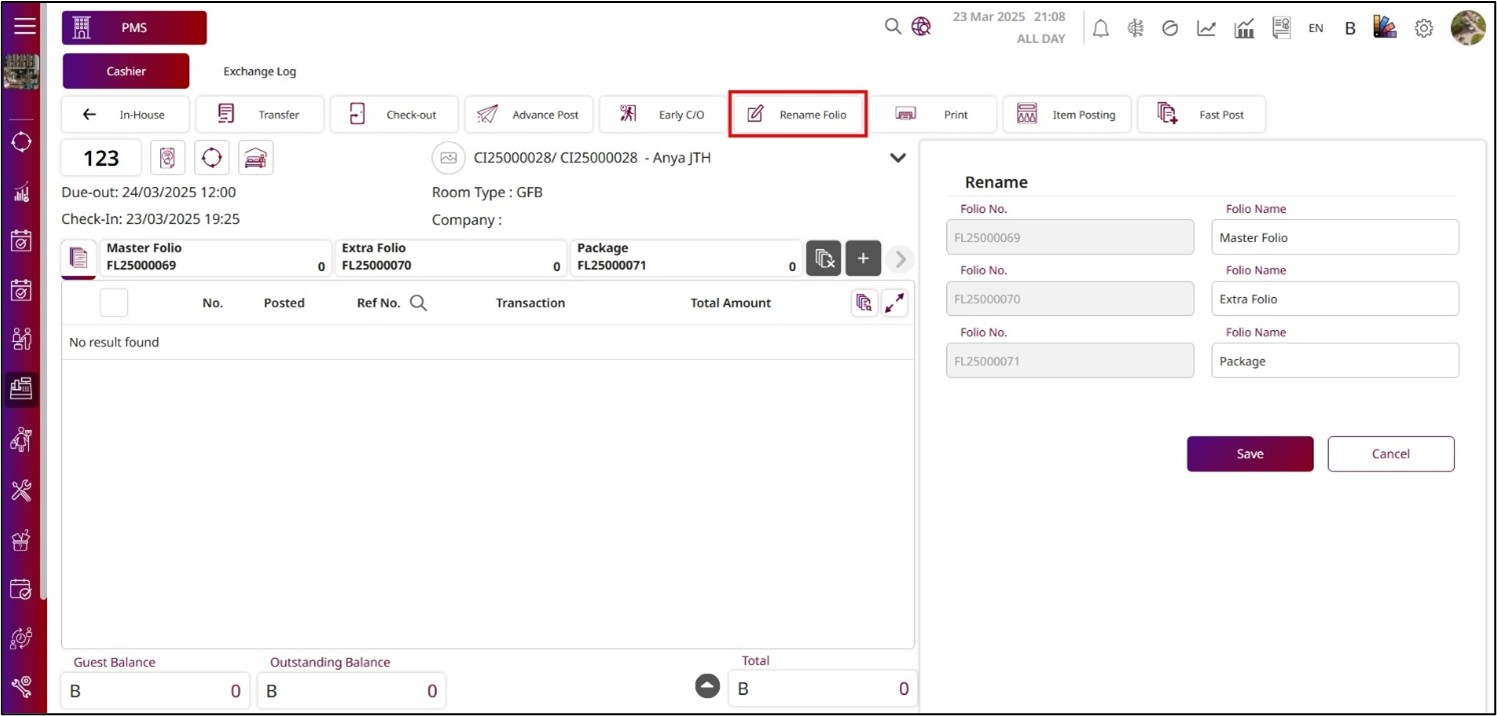
Note: This function allows staff to manage and rename folios associated with a room, making it easier to organize and identify them. Folio No. cannot be edited, but Folio Name can be updated.
7.3 Post Transaction
This function allows staff to post transactions directly to the folio associated with the selected room. Transactions may include charges for room rates, services, and other billable items, ensuring accurate guest billing throughout their stay.
To perform the task:
- Press Post to see the transaction menu.
- After pressing the menu transaction, the system will show the Post Transaction screen.
- Select the Folio to post this transaction to.
- Enter the Amount of the transaction or press the number on the right side. After pressing the Number , press the Enter icon button to fill the Amount field with the number you pressed.
- Enter the Reference No.
- Enter the Remark.
- Press Post & Return to post the transaction to the folio and close the Post Transaction function.
- Press Post & New to post the transaction but keep the Post Transaction function open.
- Press Cancel to close the Post Transaction function and discard the process.
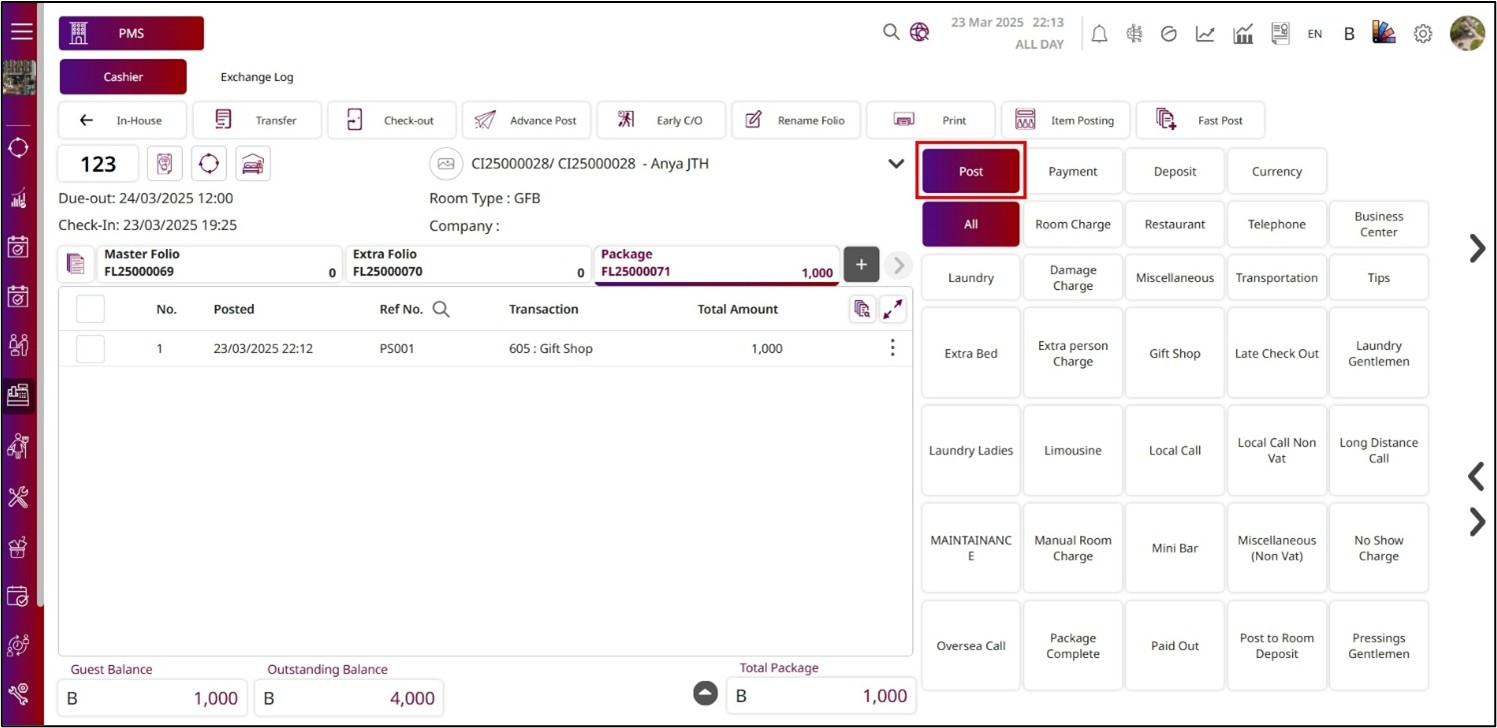
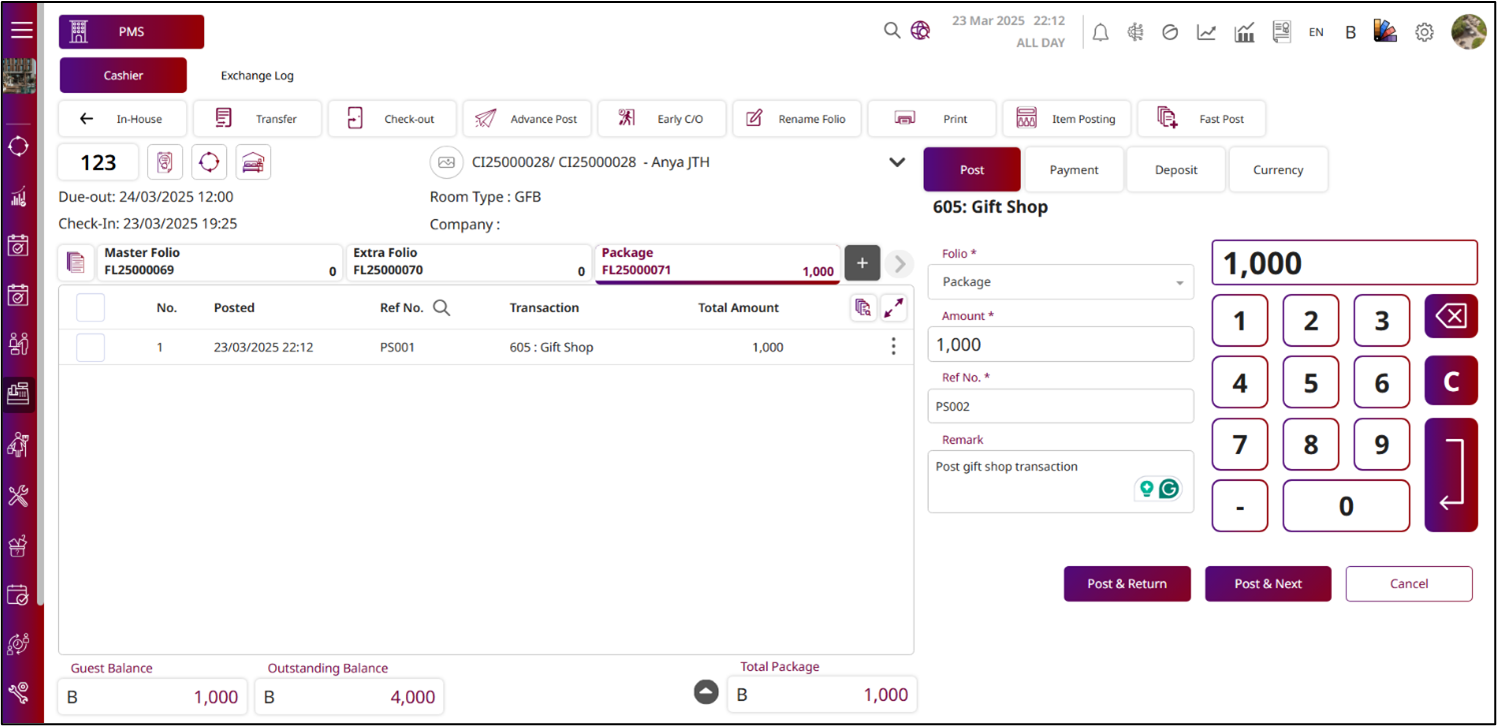
Note: Ensure that the correct Folio is selected before posting a transaction, as posting to the wrong folio may cause billing discrepancies and affect the accuracy of guest charges.
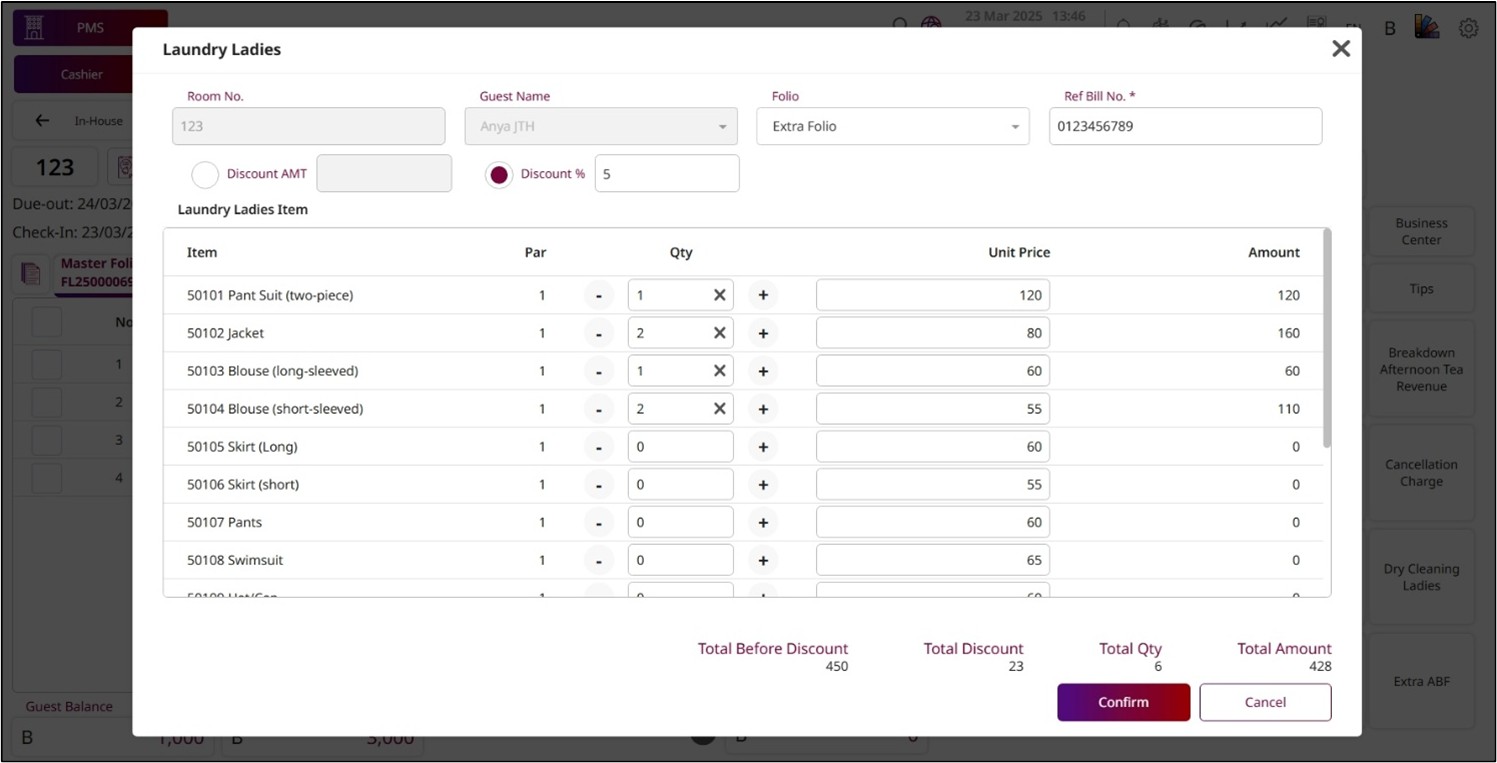
7.4 Item Posting
This function allows staff to post transaction items directly to a guest’s folio, ensuring that charges are recorded accurately. Staff can search for and select items from the list, specify the quantity for each, and post them in a single action. This is especially useful for efficiently adding multiple charges, such as room service, minibar items, or other hotel services to the folio.
To perform the task:
- Press Item Posting from the top menu bar.
- The Item Posting pop-up will be displayed, allowing you to select any menu item to show on this screen.
- After selecting a menu, it will display the items under the menu you selected.
- Select the Folio you want to post this item to.
- Enter the Reference Bill No.
- Press the + icon to add the item or enter the quantity.
- Select the Radio Button to choose the discount by Amount or by Percent.
- Press Save to post this Item Posting to the guest folio.
- Press Cancel to discard this process.
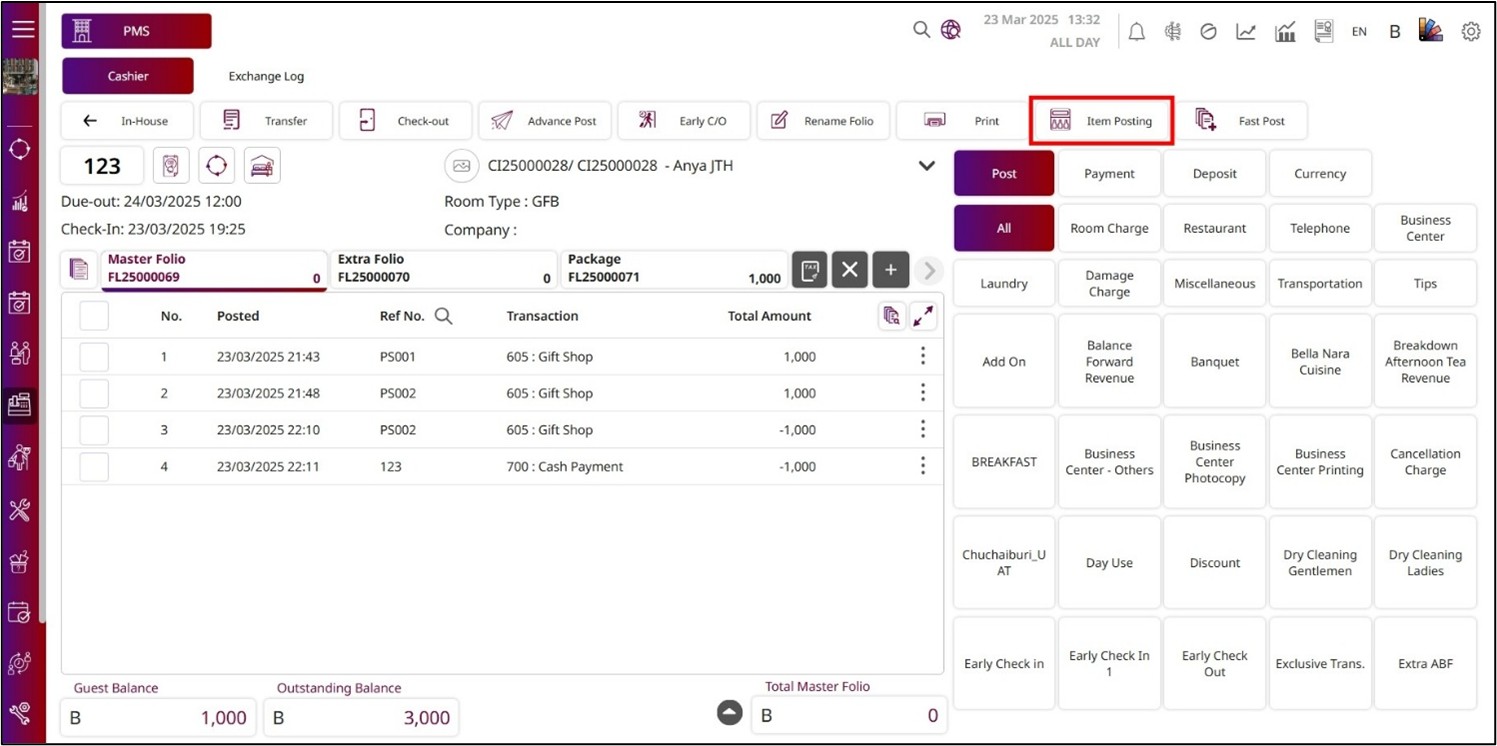
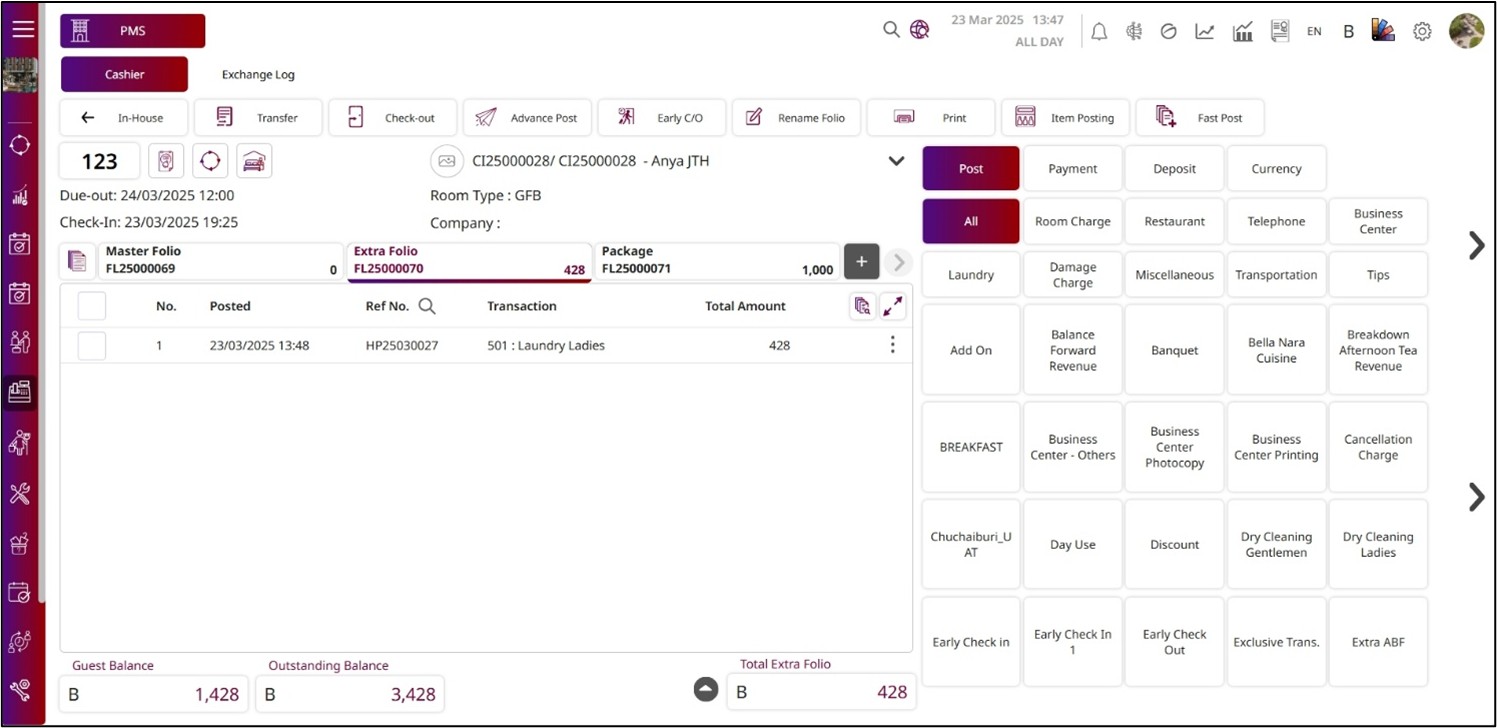
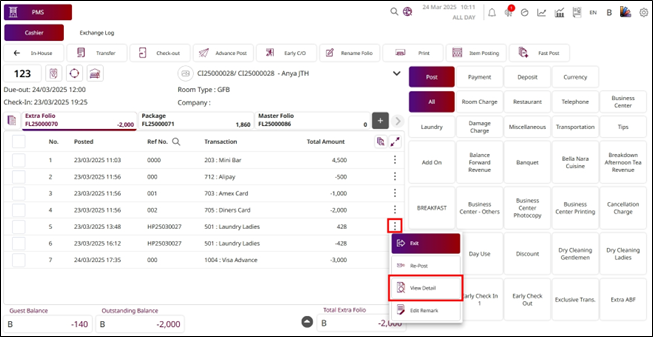
- After the system posts the item posting transaction, you can press the More Options icon.
- Press View Detail , and the View Detail pop-up will be displayed.
- This pop-up shows the details of the item posting transaction.
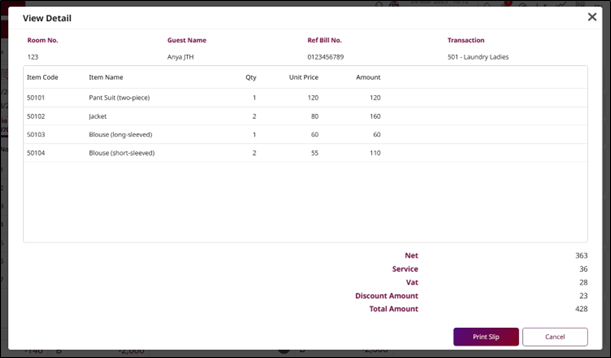
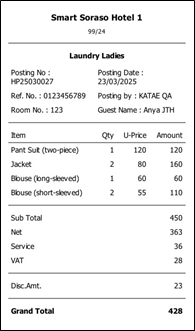
- If you want to print the slip, press Print Slip.
- Press Cancel to close this pop-up.
Note: Always verify the correct folio and quantities before posting to avoid billing errors or incorrect guest charges.
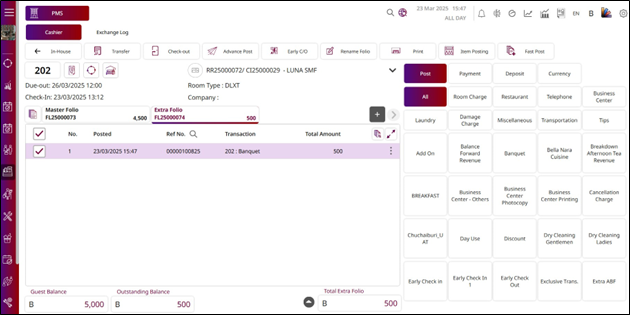
7.5 Fast Post
This function allows staff to post transactions to multiple rooms at the same time, making it faster and more efficient to handle bulk postings such as group charges, event-related fees, or shared services. By selecting multiple rooms in one action, staff can ensure consistency in charges and reduce the time needed to process individual postings.
To perform the task:
- Press Fast Post from the top menu bar.
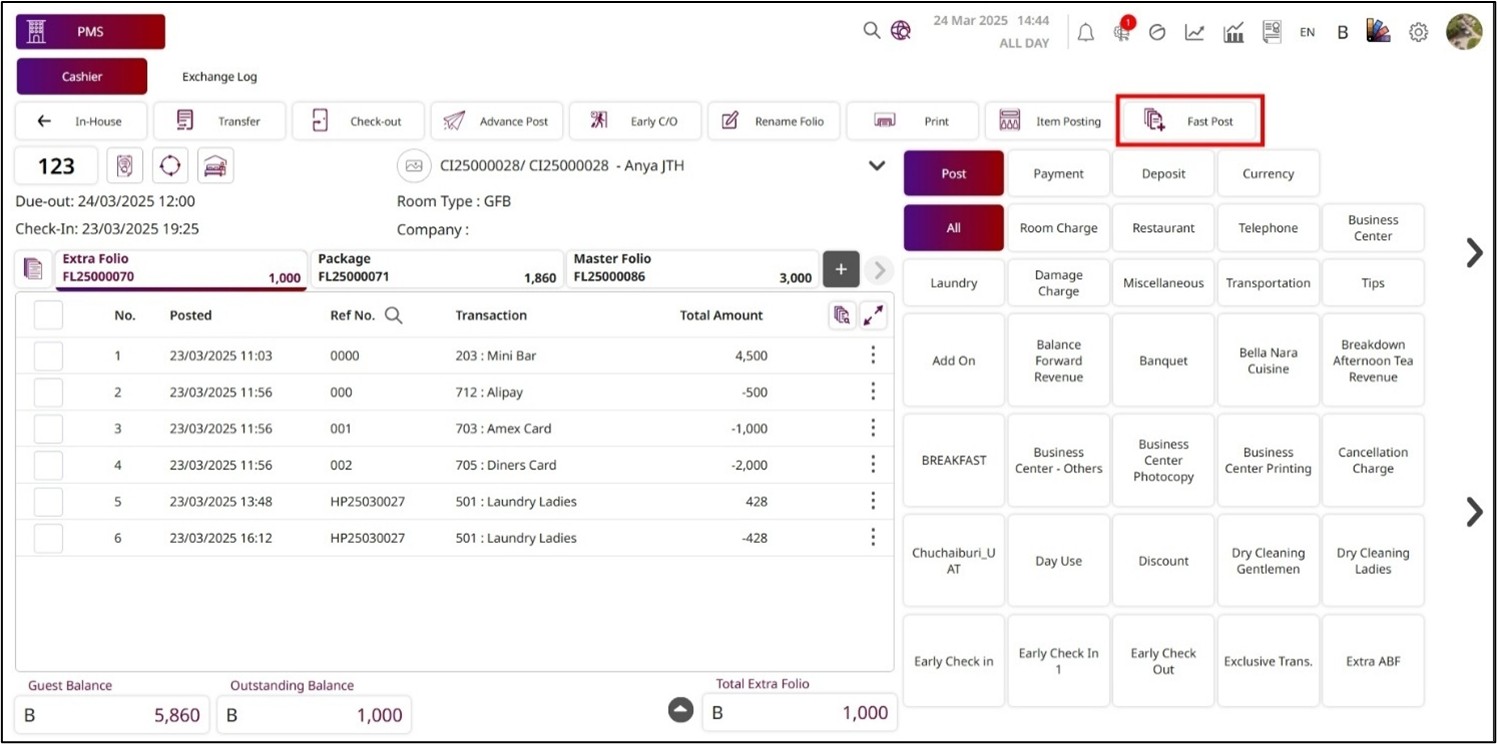
- The Fast Post pop-up will be displayed.
- If you select In House , you must select the radio button under the In-House information:
- Group : If you select Group, you must select the group that is checking into the hotel.
- Party : If you select Party, you must select the party booking that is checked into the hotel.
- Individual : If you select Individual, you must select the individual booking that is checked into thehotel.
- If you select Building , you must select the Building and the Floor.
- Press Retrieve , and the rooms under the selected information will show at the bottom.
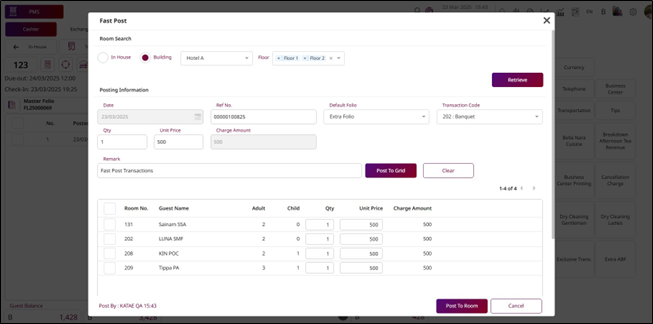
- Enter the Reference No.
- Select the Default Folio to post the transaction to the guest folio.
- Select the Transaction Code.
- Enter the QTY and the Unit Price , and the system will calculate the Charge Amount automatically.
- Enter the Remark.
- Press Post to Grid , then the QTY and Unit Price will update for all the rooms that are showing at the bottom.
- Press Clear to clear the Posting Information.
- If you want to change the QTY or Price for some rooms, you can enter the number of QTY and the Price.
- Total QTY and Total Amount will be calculated automatically from all the rooms.
- Press Post to Room to post the transaction to the rooms.
- Press Cancel to discard the process.

Note: Double-check the selected rooms and transaction details before confirming a fast post to prevent billing errors and ensure accuracy for all affected guests.
7.6 Transfer Transaction
This function allows staff to transfer transactions from one folio to another, either within the same room or to a folio in a different room. It is useful for scenarios such as splitting charges, moving expenses between guests, or reallocating charges for group or corporate billing.
To perform the task:
- Press Transfer from the top menu bar.
- The system will show the other folio in the same room on the right side.
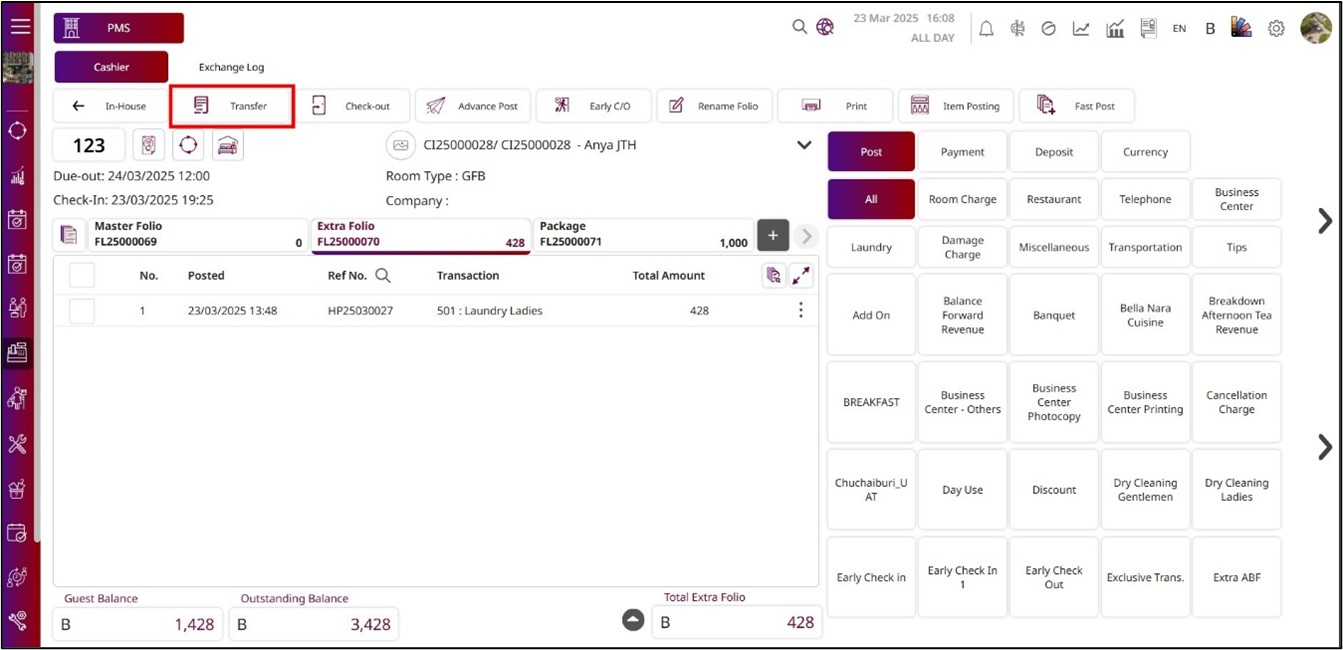
- If you want to change the room, press the room on the right side to open the Change Room pop-up.
- Press Select & Go to select a room, and the system will change the room on the right side.

- Select the transaction and drag and drop it to another folio or room.
- Press Full Amount to continue the process, and the transaction will transfer to the destination folio.
- Press Cancel to discard the process.
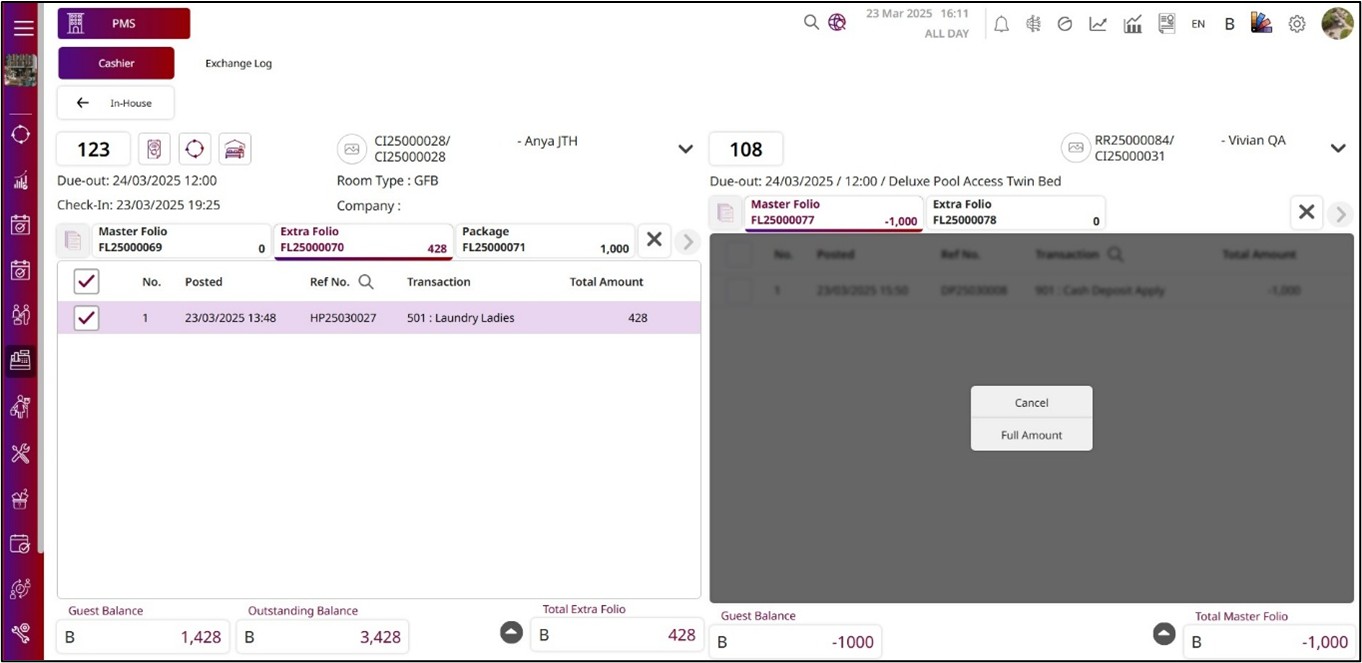

Note: If a transaction has already been paid or canceled, it cannot be selected when using the Transfer function.
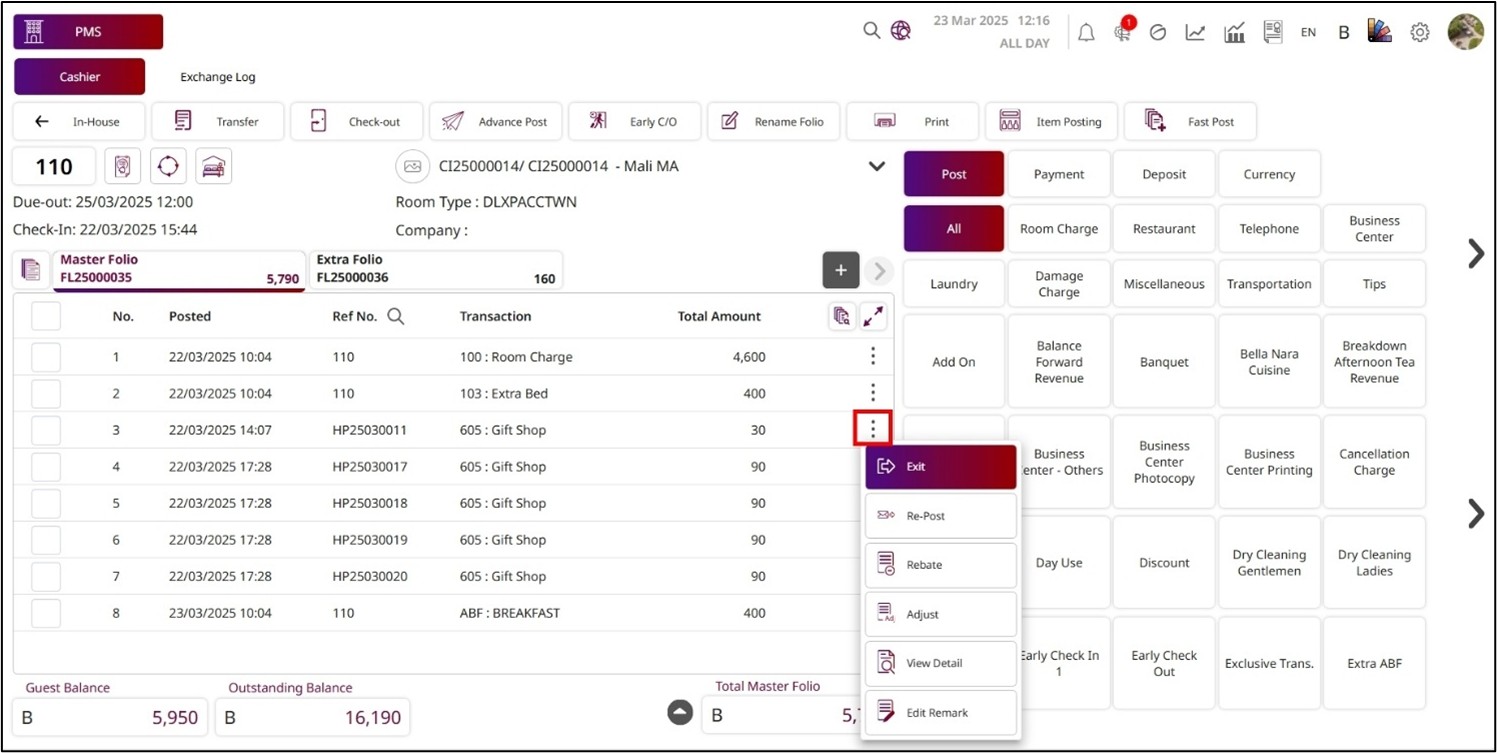
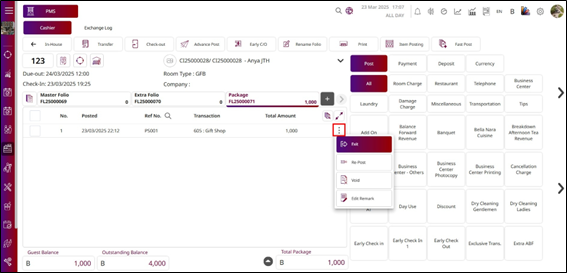
7.7 Void
This function allows staff to void a transaction that has not yet been paid. The transaction must also have been posted on the same day. This restriction ensures that only same-day, unpaid transactions can be removed, helping maintain accurate financial records and preventing any changes to finalized transactions.
To perform the task:
- Press the More Options icon.
- Press Void , and the Void function will open on the right side.
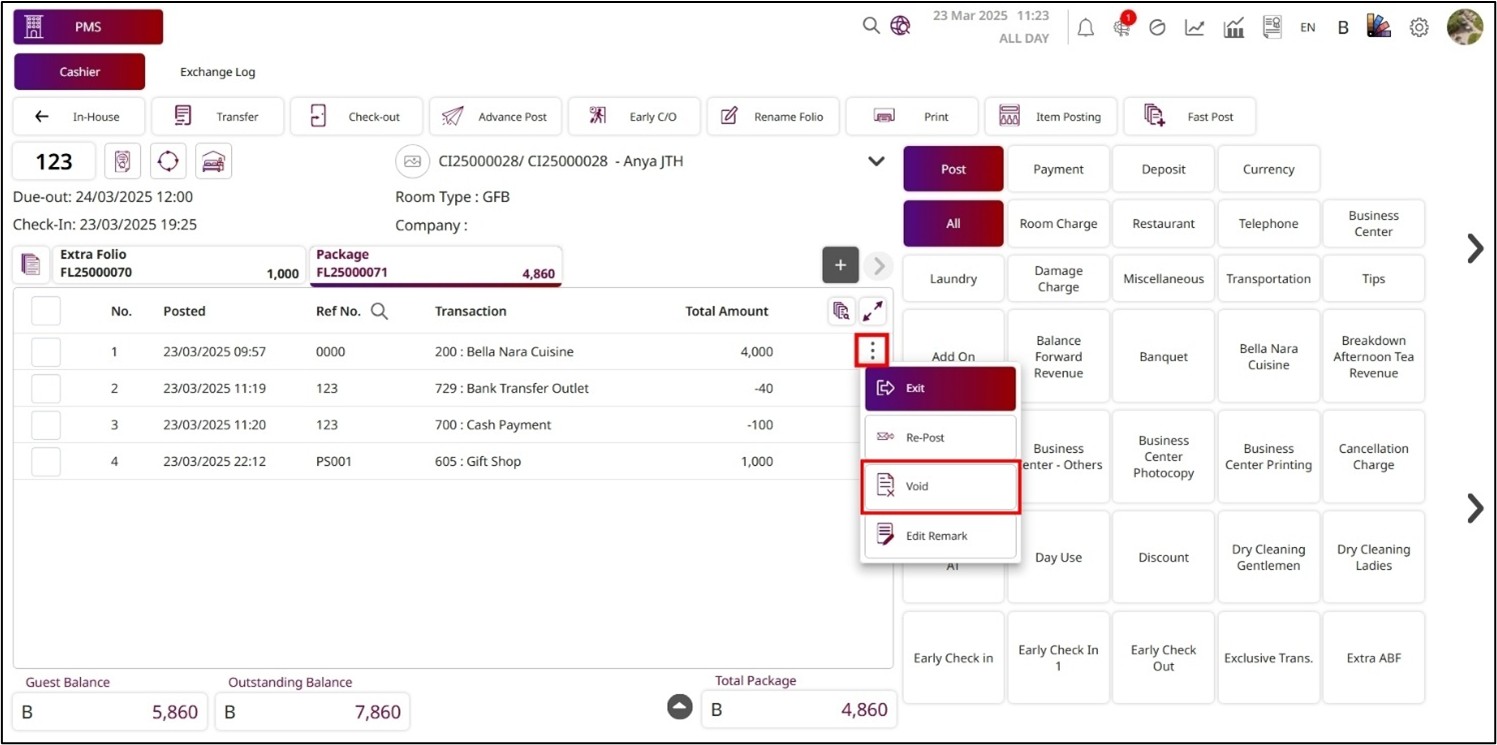
- The Folio will show the folio where the transaction has been posted.
- The Amount is the total amount for this transaction.
- The Reference No. is the reference number of this transaction.
- The Folio, Amount, and Reference No. fields are not editable.
- Enter the Remark for voiding this transaction.
- Press Void to complete the process.
- Press Cancel to discard the process.
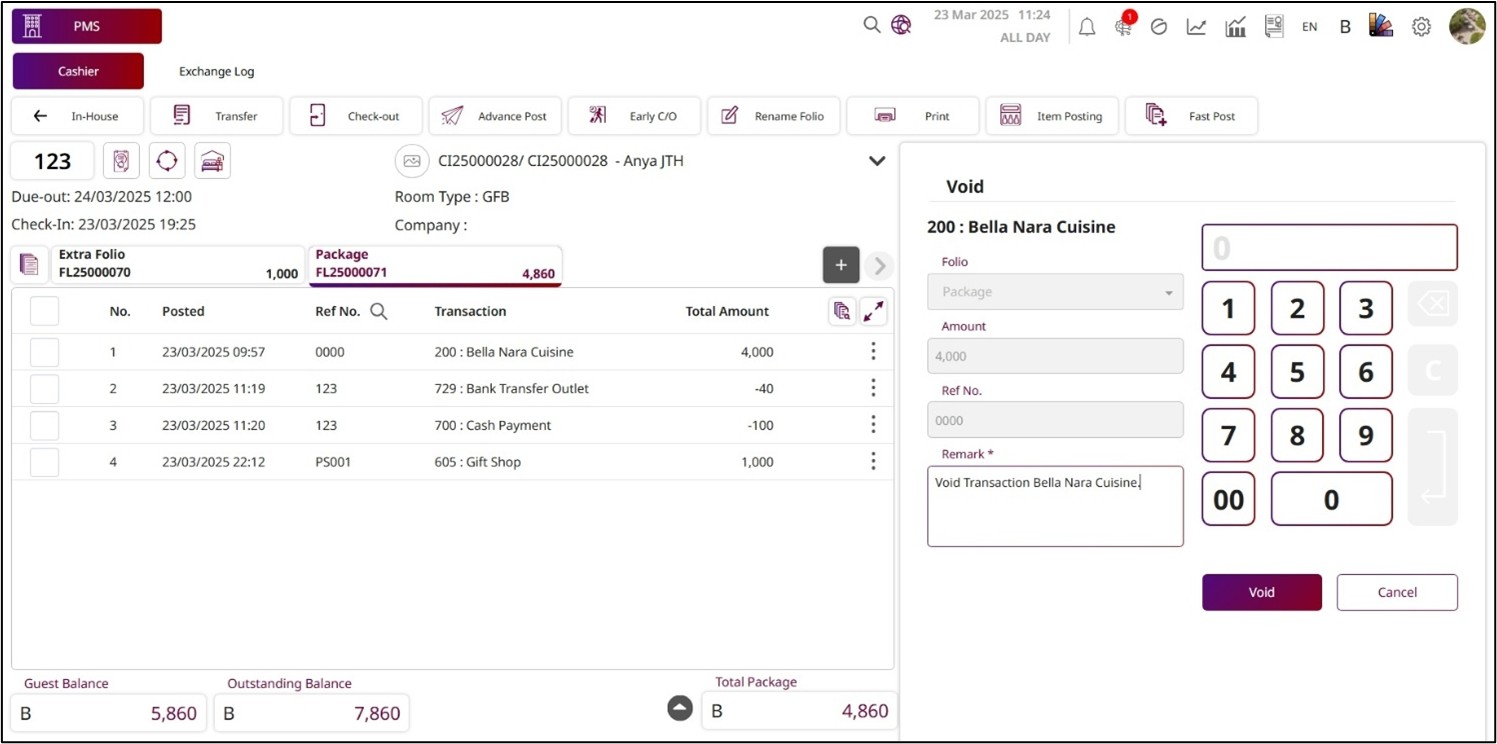
Note: Voiding a transaction is irreversible. Once voided, the transaction will be permanently removed from the system and cannot be recovered.
7.8 Re-Post
This function allows staff to re-post a transaction that has not been fully paid. It can be applied to transactions posted on the same day or on previous dates. This is particularly useful for correcting posting errors or updating transaction details without creating a new entry.
To perform the task:
- Press the More Options icon.
- Press Re-post , and the Repost function will open on the right side.
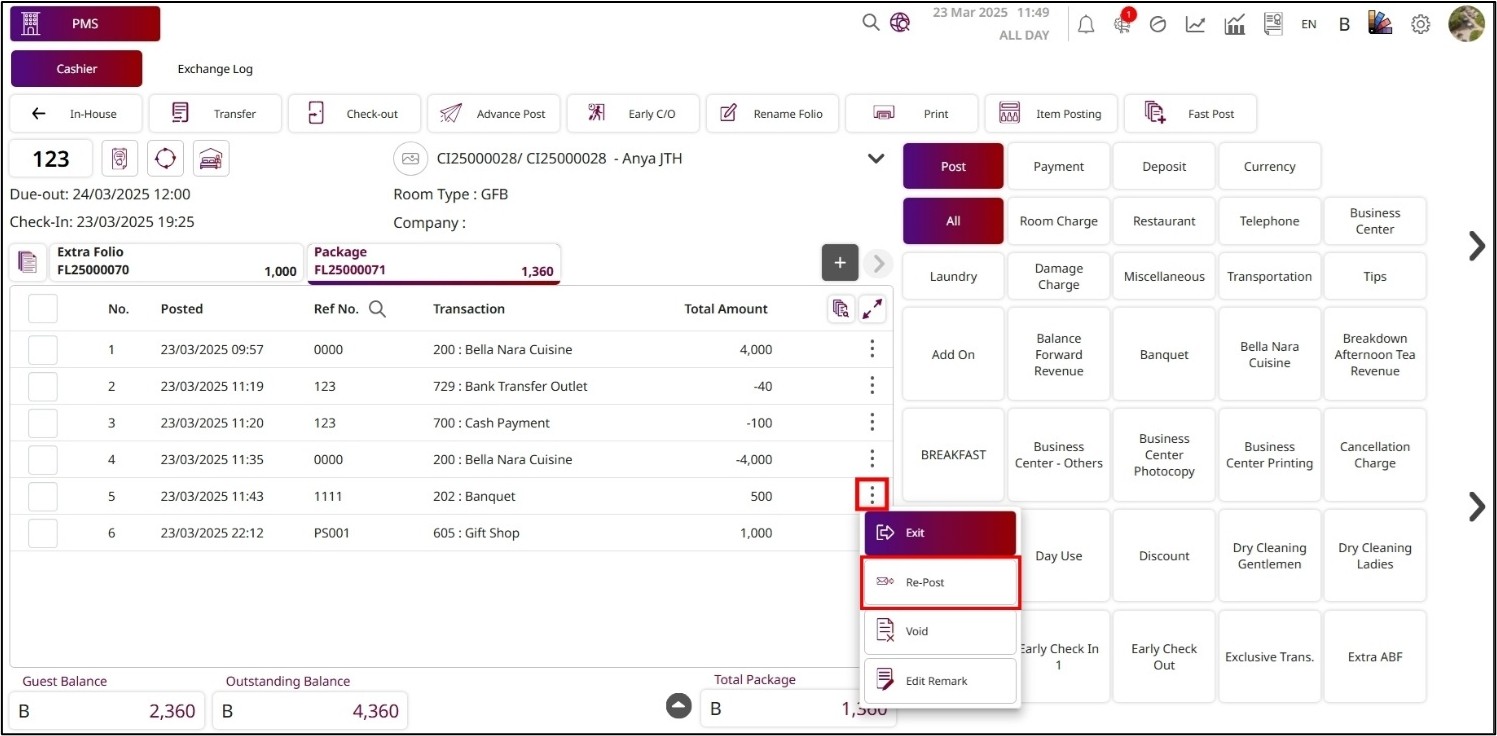
- The Folio will show the folio where the transaction has been posted; you can also change to another folio.
- The Amount is the total amount for this transaction; you can change the amount by entering a new value or using the numpad.
- The Reference No. is the reference number of this transaction; you can also change it for the new reposted transaction.
- Enter the Remark for the repost of the transaction.
- Press Post & Pay to complete the process.
- Press Cancel to discard the process.
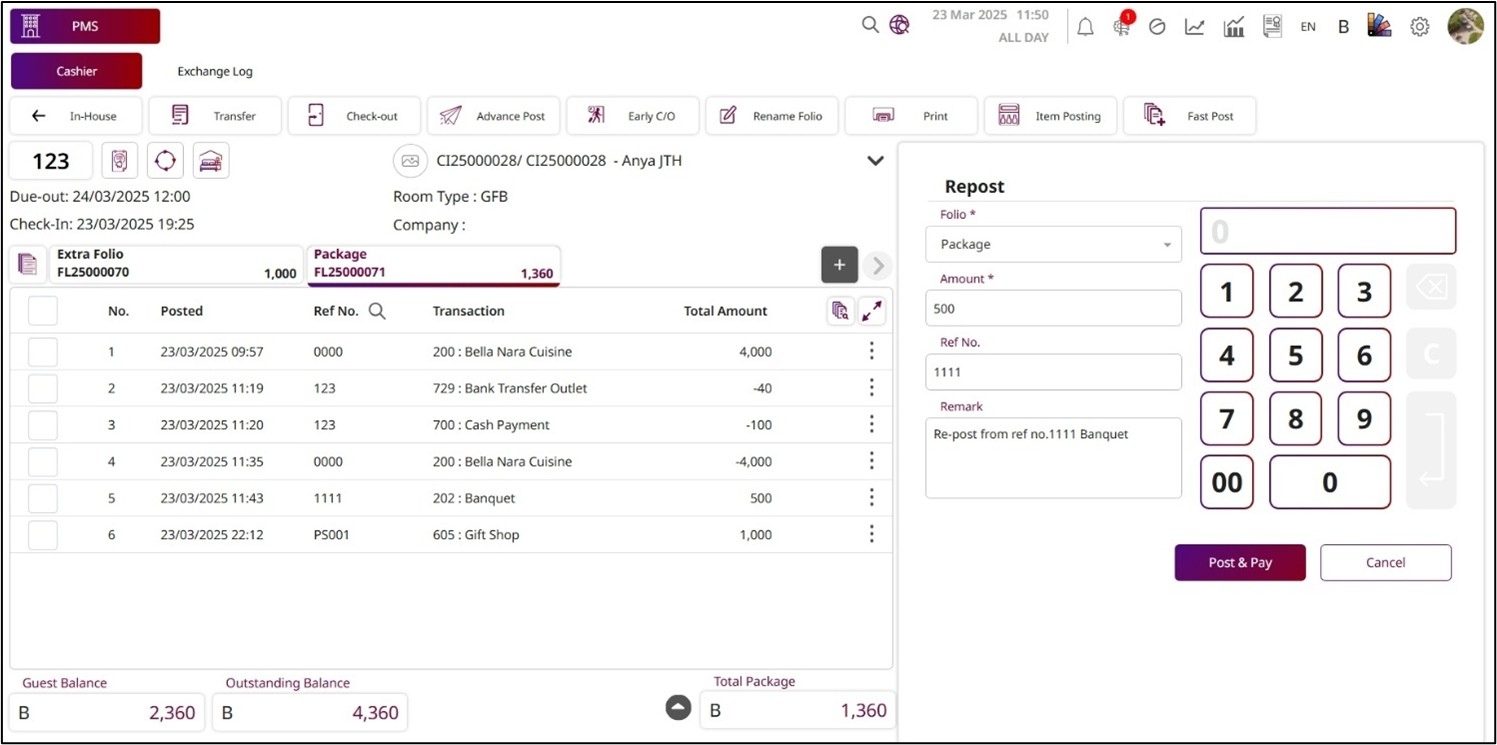
Note: Ensure all amounts, dates, and details are correct before proceeding to maintain accurate financial records.
7.9 Rebate
This function allows staff to cancel a transaction that was posted on a previous day. The rebate amount must be less than or equal to the original posted amount. This ensures that only valid partial or full cancellations are processed for prior-day transactions, helping maintain accurate and consistent financial records.
To perform the task:
- Press the More Options icon.
- Press Rebate , and the Rebate function will open on the right side.
- The Folio will show the folio where the transaction has been posted; you cannot change it to another folio.
- The Amount is the total amount for this transaction; you can change the amount by entering a new value or using the numpad, but the amount must be less than or equal to the amount that has been posted.
- The Reference No. is the reference number of this transaction and cannot be edited.
- Enter the Remark for the rebate of the transaction.
- Press Rebate to complete the process.
- Press Cancel to discard the process.
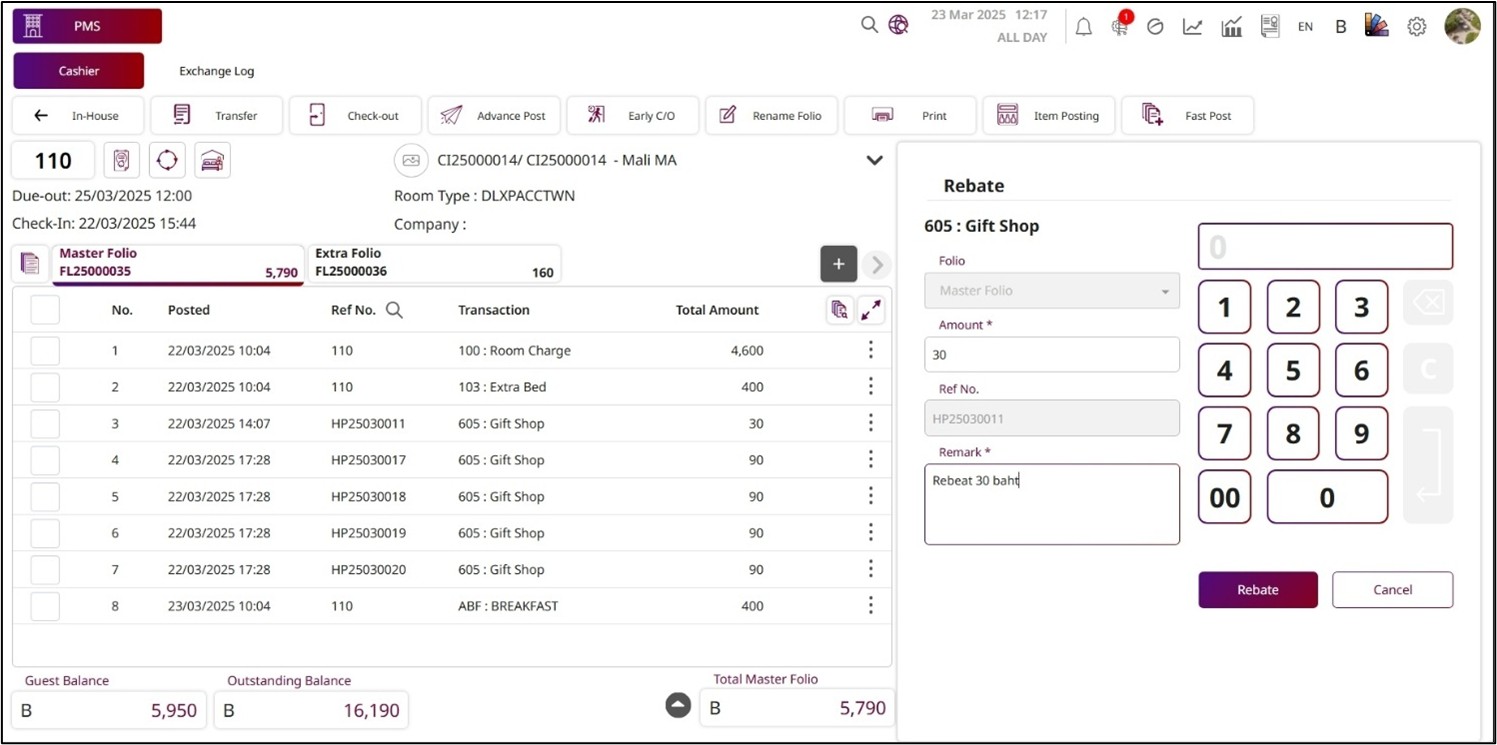
Note: Verify the original transaction amount before processing and ensure the rebate does not exceed it. Changes are permanent and cannot be undone.
7.10 Adjust
This function allows staff to adjust a transaction that was posted on a previous day. The adjustment amount can be equal to, less than, or greater than the original posted amount. It is typically used to correct errors or revise charges after review, ensuring the folio reflects accurate and up-to-date financial records.
To perform the task:
- Press the More Options icon.
- Press Adjust , and the Adjust function will open on the right side.

- The Folio will show the folio where the transaction has been posted; you cannot change it to another folio.
- The Amount is the total amount for this transaction; you can change the amount by entering a new value or using the numpad.
- The Reference No. is the reference number of this transaction and cannot be edited.
- Enter the Remark for the adjustment of the transaction.
- Press Adjust to complete the process.
- Press Cancel to discard the process.
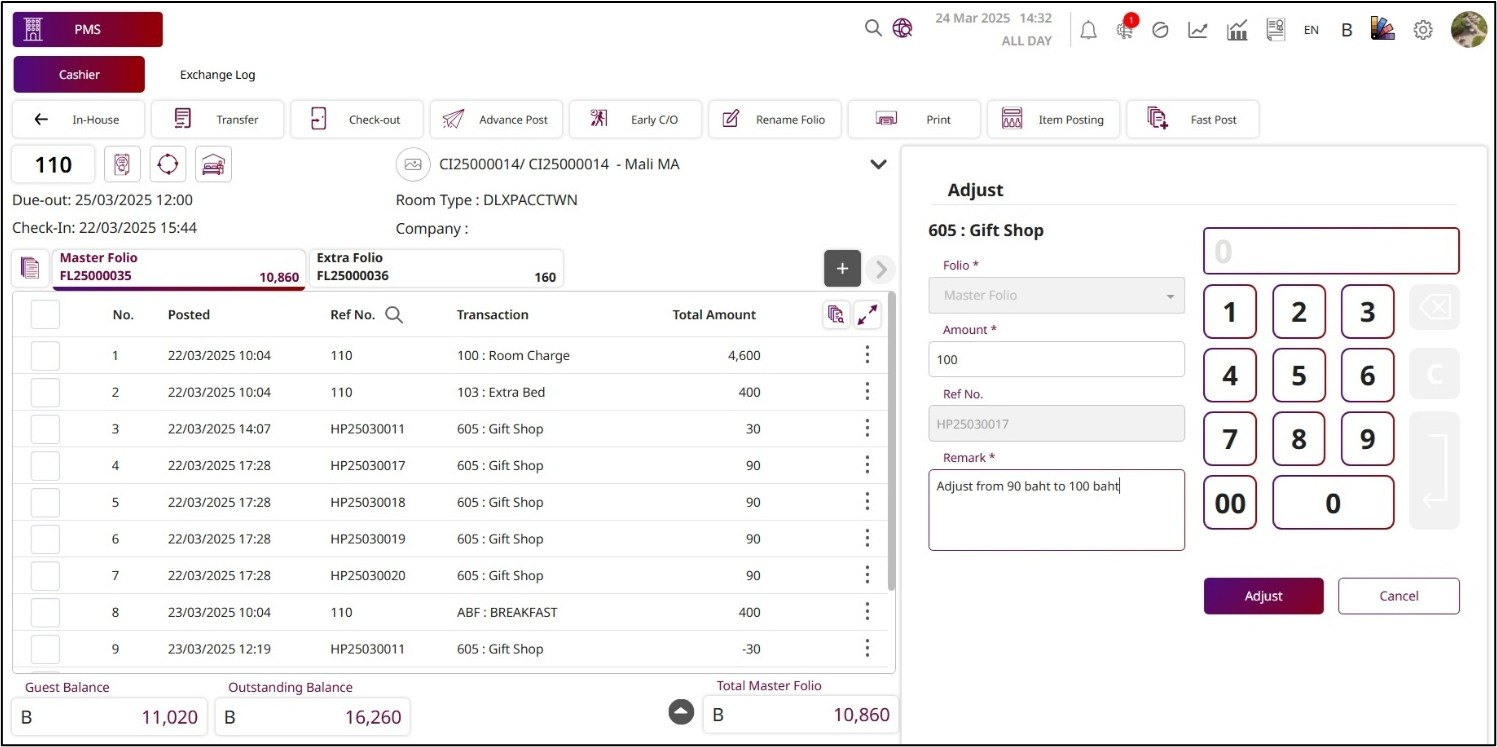
Note: Verify the original posted amount before adjusting, and ensure all changes are accurate. Adjustments are final and cannot be reversed.
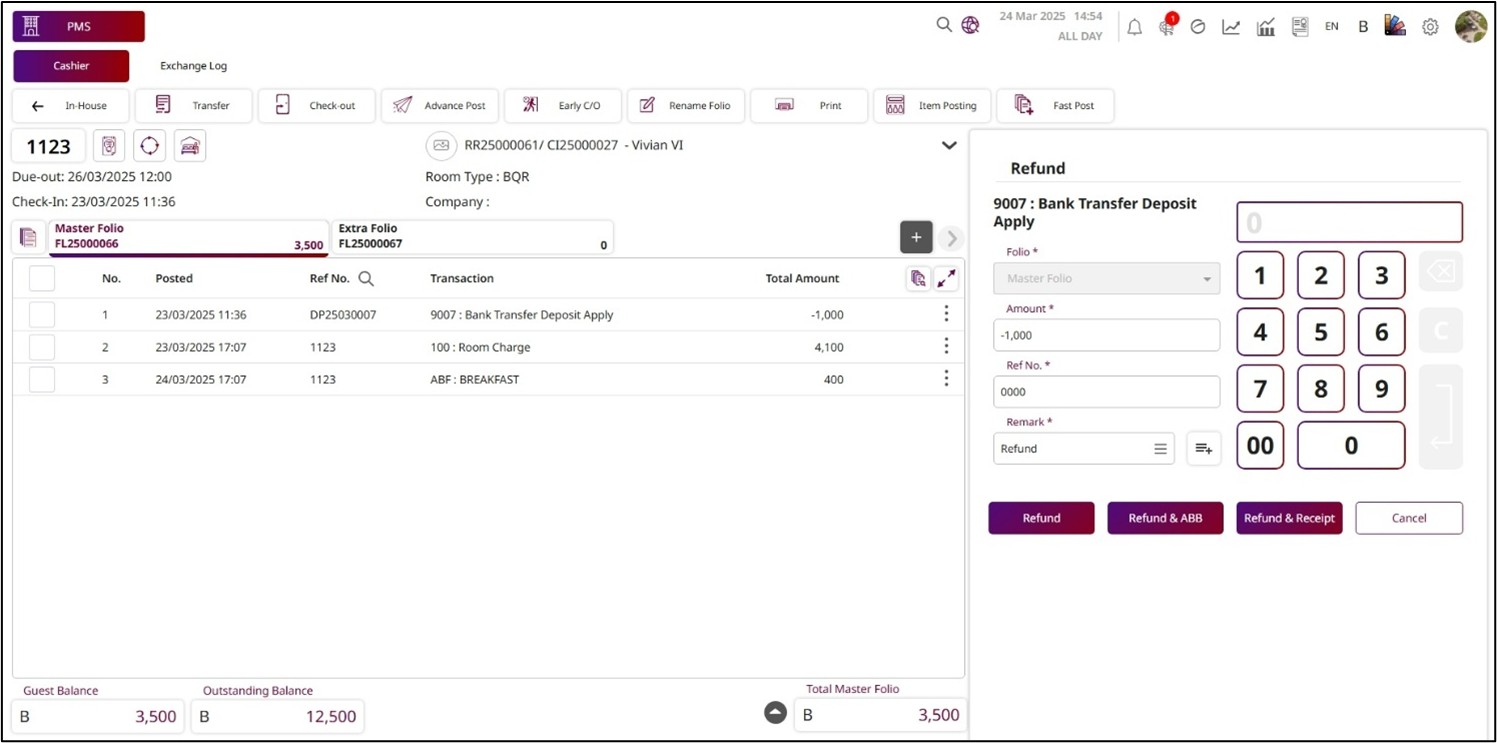
7.11 Refund
This function allows staff to issue a refund from a deposit transaction. It is typically used when a guest cancels, shortens their stay, or is entitled to receive back part or all their deposit. The refund amount can be partial or full, depending on the hotel’s policy and the original deposit amount.
To perform the task:
- Press the More Options icon.
- Press Refund , and the types of refund will be displayed; you must select the type of refund.
- The Refund function will then open on the right side.

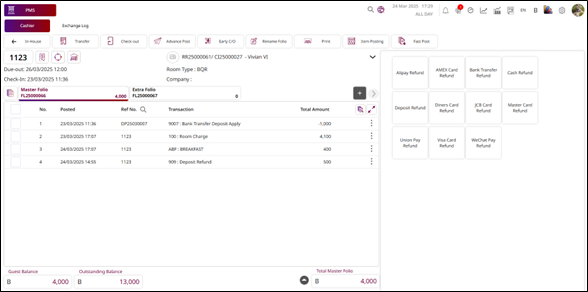
- The Folio will show the folio where the transaction has been posted; you cannot change it to another folio.
- The Amount is the total amount for this transaction; you can change the amount by entering a new value or using the numpad, but the amount must be less than or equal to the amount of the deposit.
- Enter the Reference No. for the refund.
- Enter the Remark for the refund of the transaction.
- Press Refund to complete the process. If you press Refund & ABB , it will generate an ABB and save the process. If you press Refund & Receipt , it will print the receipt immediately and save the process.
- Press Cancel to discard the process.
7.12 Cancel Deposit
This function allows staff to cancel a deposit transaction. It is only available when the hotel is using the non- VAT policy, ensuring that deposit cancellations comply with the hotel’s tax configuration and financial procedures.
To perform the task:
- Press the More Options icon.
- Press Cancel Deposit , and the Cancel Deposit function will open on the right side.
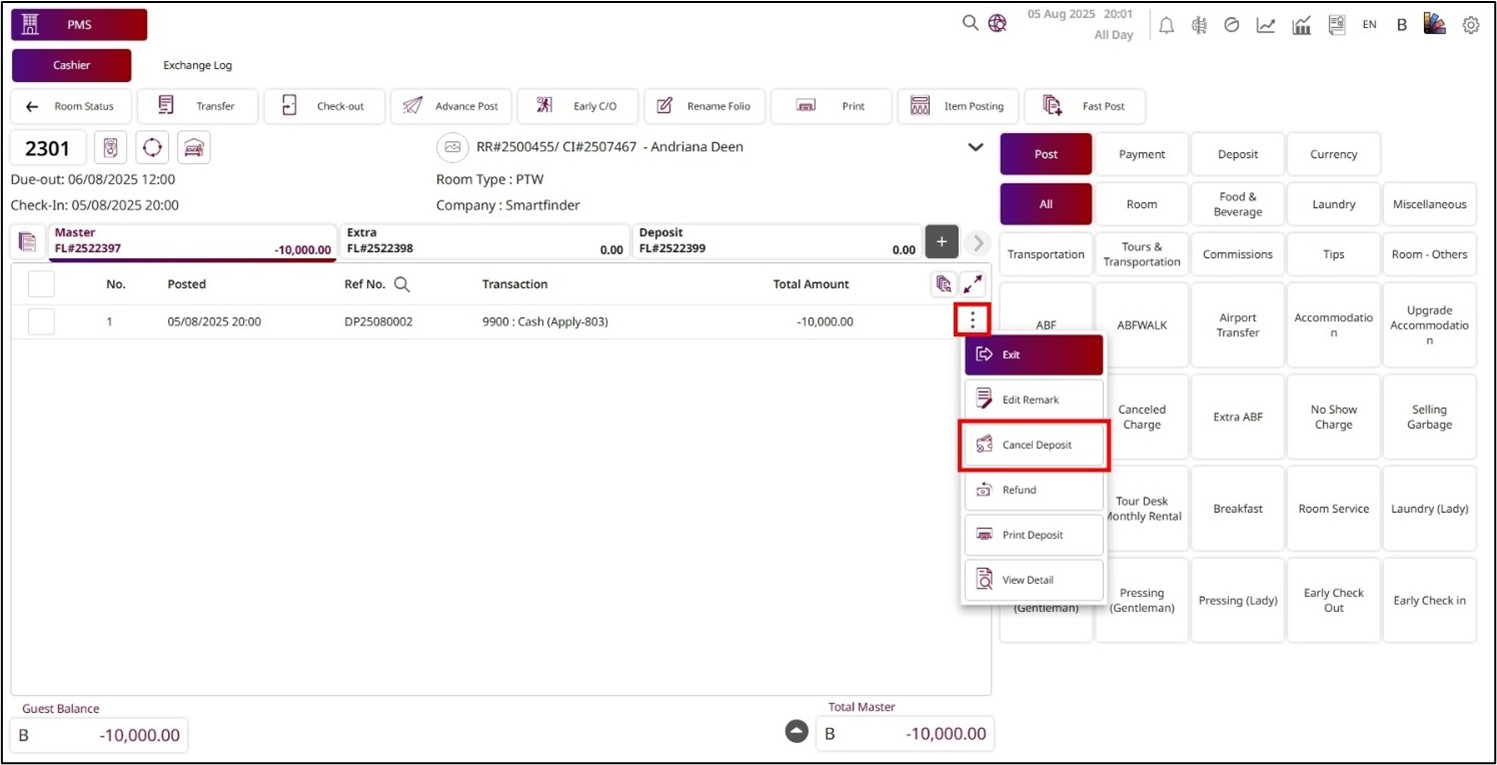
- The Folio will show the folio where the deposit transaction has been posted; this field is not editable.
- The Amount shows the deposit transaction amount and cannot be edited.
- Enter the Remark for the canceled deposit.
- Press Cancel Deposit to complete the process.
- Press Cancel to discard the process.
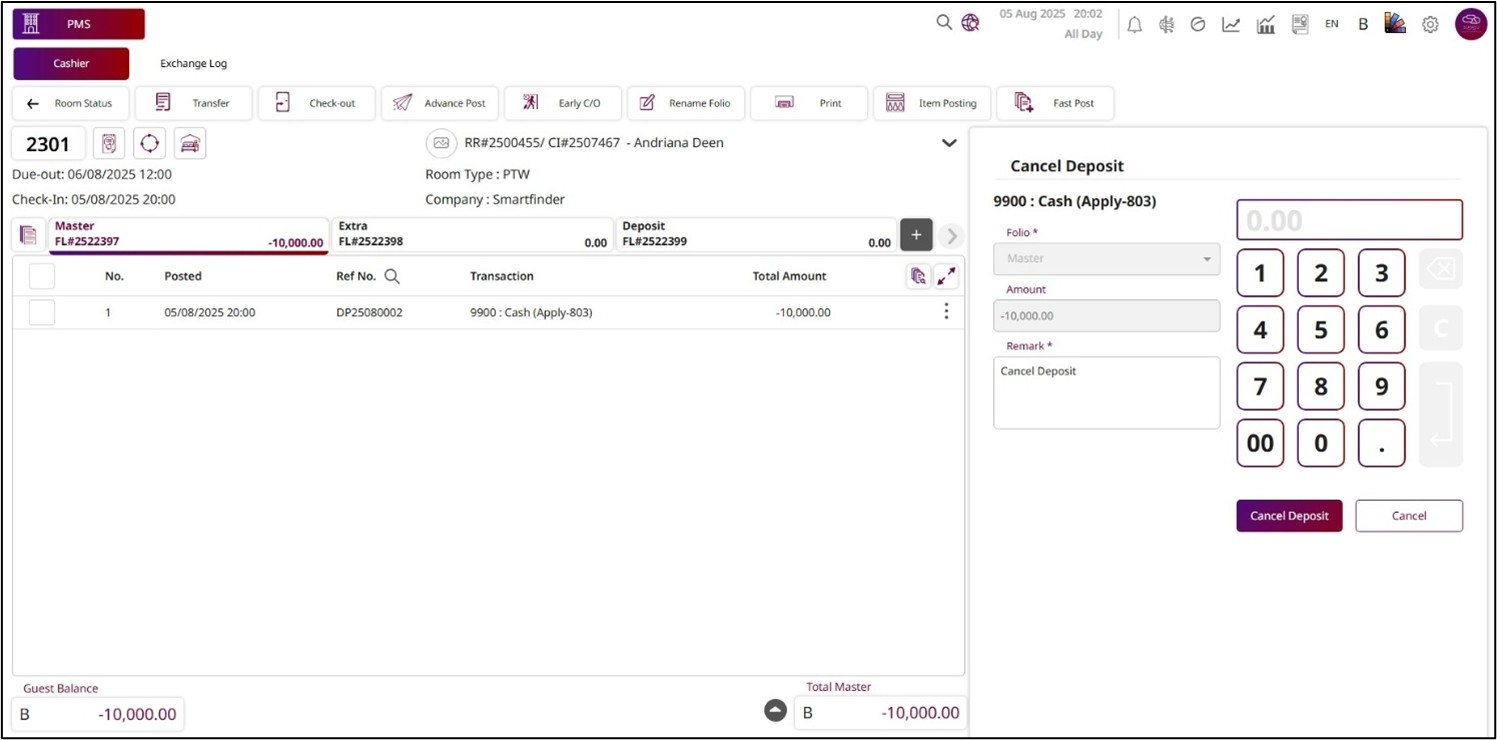
Note: This action cancels a deposit transaction under the non-VAT policy and cannot be undone. Ensure the cancellation complies with hotel policies before proceeding.
7.13 Cancel Payment
This function allows staff to cancel a payment transaction, available only when the hotel operates under the non-VAT policy. It ensures that payment cancellations align with the property’s tax configuration and financial procedures. This feature is typically used to correct payment errors or reverse payments while maintaining compliance with non-VAT accounting rules.
To perform the task:
- Press the More Options icon. Press the More Options icon.
- Press Cancel Payment , and the Cancel Payment function will open on the right side.
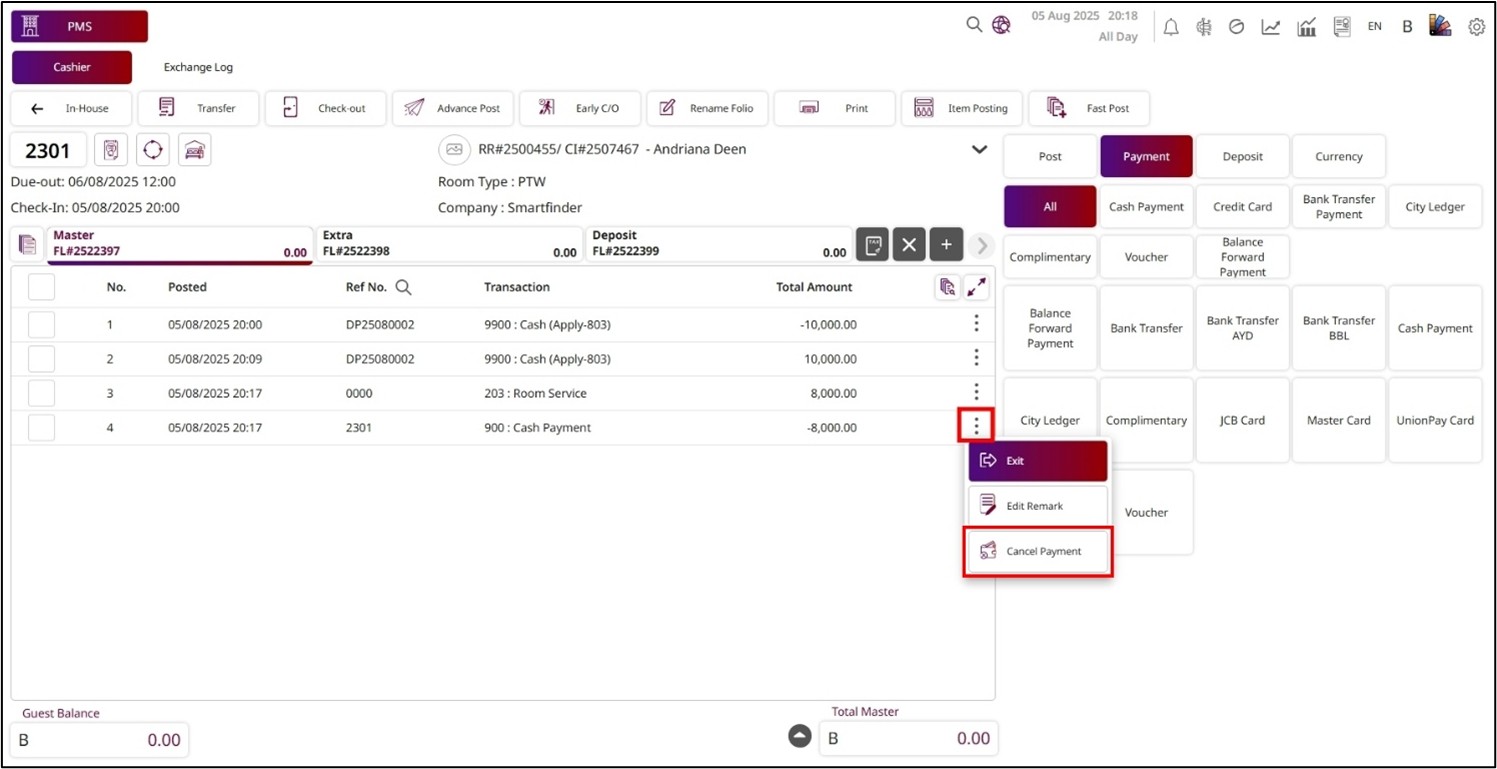
- The Folio will show the folio where the payment transaction has been posted; this field is not editable.
- The Amount shows the payment transaction amount and cannot be edited.
- Enter the Remark for the canceled payment.
- Press Cancel Payment to complete the process.
- Press Cancel to discard the process.
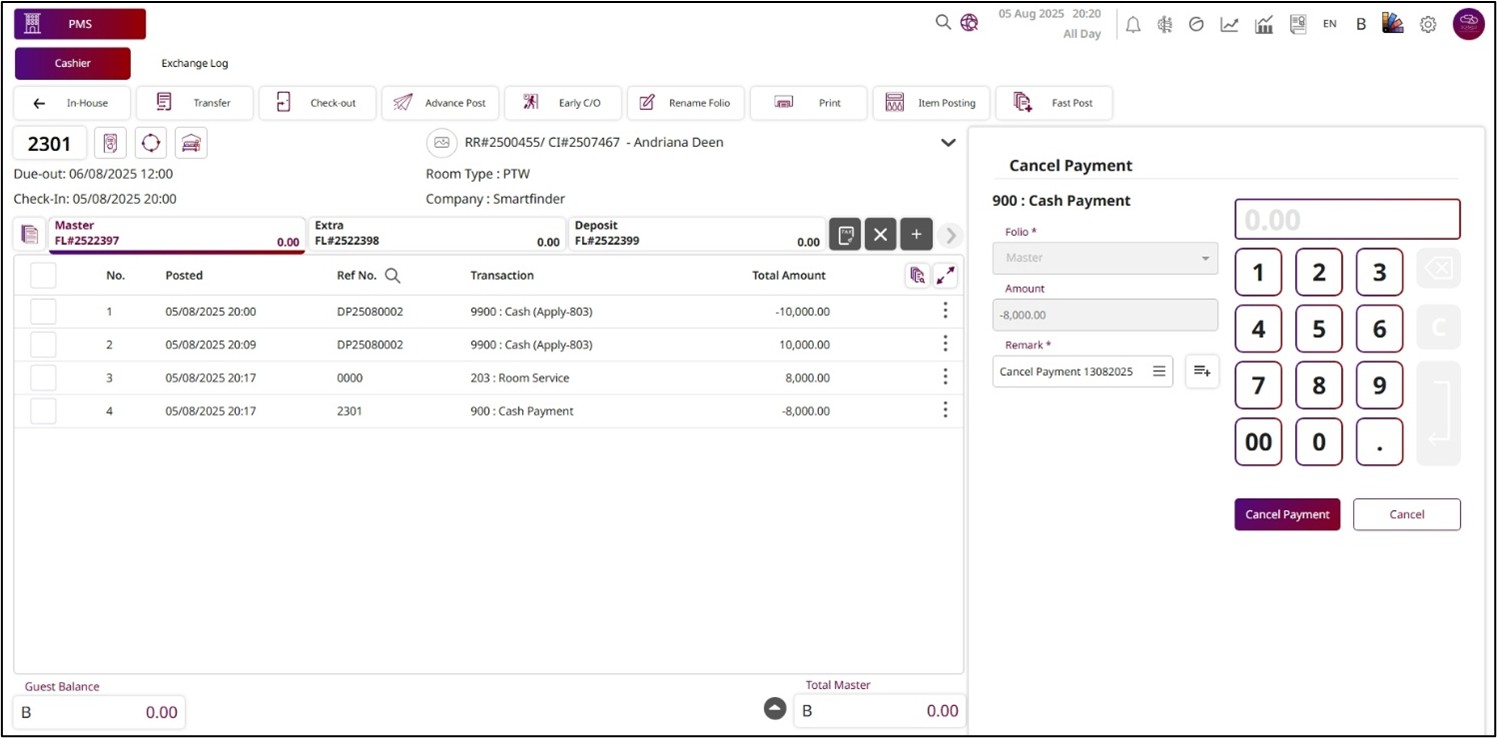
Note: Available only under the non-VAT policy. Payment cancellations are final and cannot be undone.
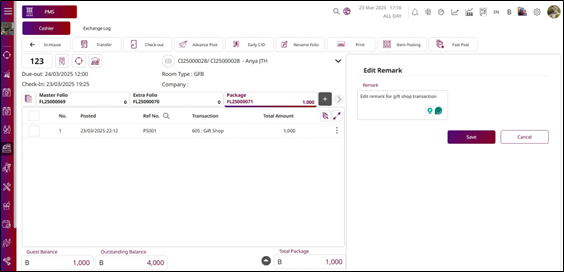
7.14 Edit Remark
This function allows staff to edit the remark of a transaction, and the updated remark will appear on the related transaction document or folio. It is useful for adding clarifications, special notes, or additional details about the posted charge or payment.
To perform the task:
- Press the More Options icon.
- Press Edit Remark , and the Edit Remark function will open on the right side.
- Enter the new keyword for the remark or edit the existing remark.
- Press Save to save the new remark.
- Press Cancel to discard the process.
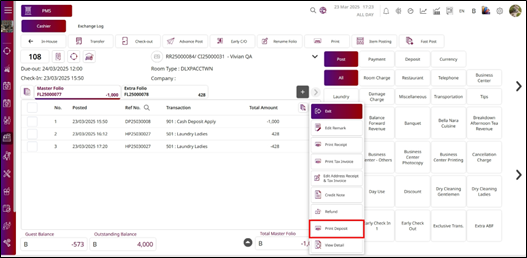
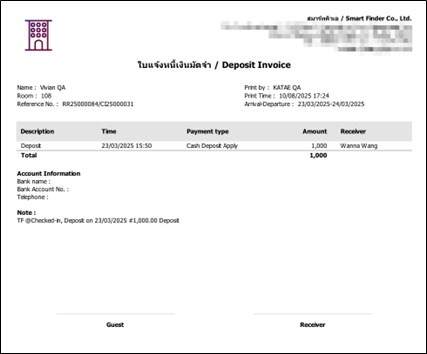
7.15 Print Deposit
This function allows staff to print deposit transactions for record-keeping or guest receipts. The Print Deposit option will only appear if the selected transaction is a deposit. If you select any other type of transaction, this option will not be available, ensuring that only valid deposit records can be printed.
To perform the task:
- Press the More Options icon on the deposit transaction.
- Press Print Deposit.
- The system will show the Deposit file from the transaction that you selected.
7.16 Advance Post
This function allows staff to post transactions for future dates beyond today, ensuring that upcoming charges are recorded in advance. It is typically used for room charges or other scheduled charges, such as package fees or pre-arranged services, that need to be applied to a guest’s folio for the upcoming days.
To perform the task:
- Press Advance Post from the top menu bar.
- The Advance Post pop-up will be displayed, showing all the transactions from this room, including transactions for the next days.
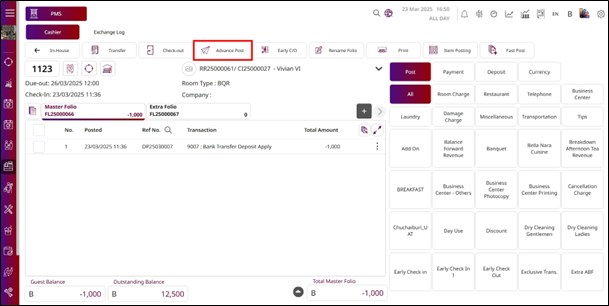
- Select the transaction, or you can select all the transactions.
- Press Confirm to post the selected transaction(s) to the room folio.
- Press Cancel to discard the process and close the pop-up.

Note: The transaction will be posted to the folio displayed in the pop-up. Always verify the posting date and folio before confirming to ensure charges are applied correctly to the intended future date.
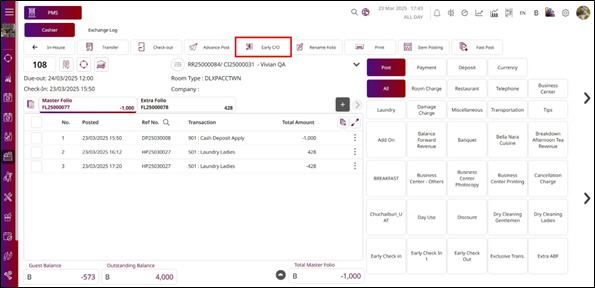
7.17 Early C/O (Early Check Out)
This function allows staff to check out a guest before their scheduled departure date. When used, the system automatically calculates any necessary adjustments, updates charges if applicable, and changes the guest’s status to reflect the early check-out.
To perform the task:
- Press Early C/O from the top menu bar.
- The system will automatically post the transaction for this room and calculate the total change for this room.

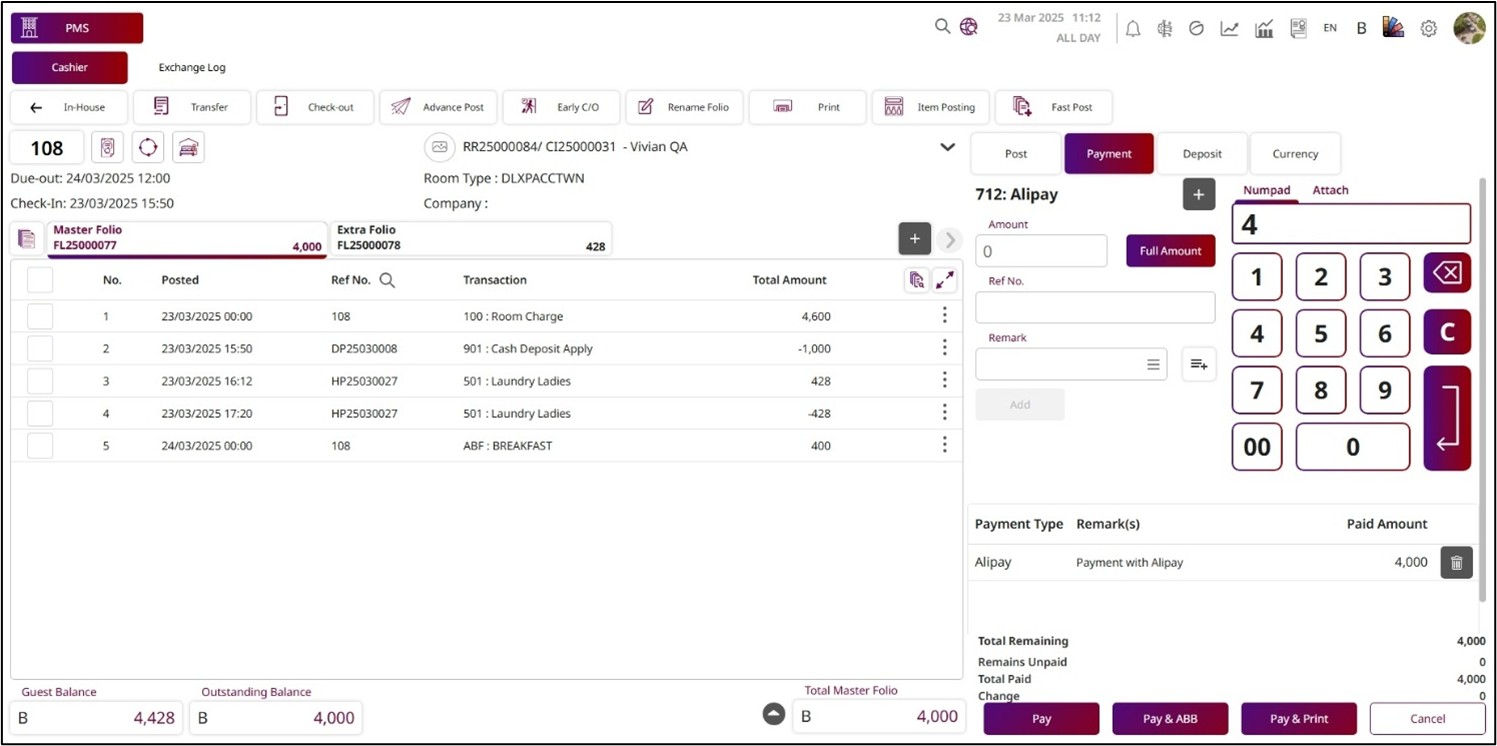
7.18 Single Payment
This function is used to record a guest’s payment into their folio, directly managing financial transactions associated with the guest’s account in the hotel. It provides a systematic and organized way to record and manage payment information, ensuring accuracy and proper tracking for both guest billing and hotel financial records.
To perform the task:
- Press Payment.
- Press a payment type, and the payment function will be displayed on the right side.

- Enter the Amount or press Full Amount , or you can use the Numpad to fill the amount.
- Enter the Reference No.
- Enter the Remark.
- Press Add , and the payment information will show the Payment Type, Remark, and Paid Amount.
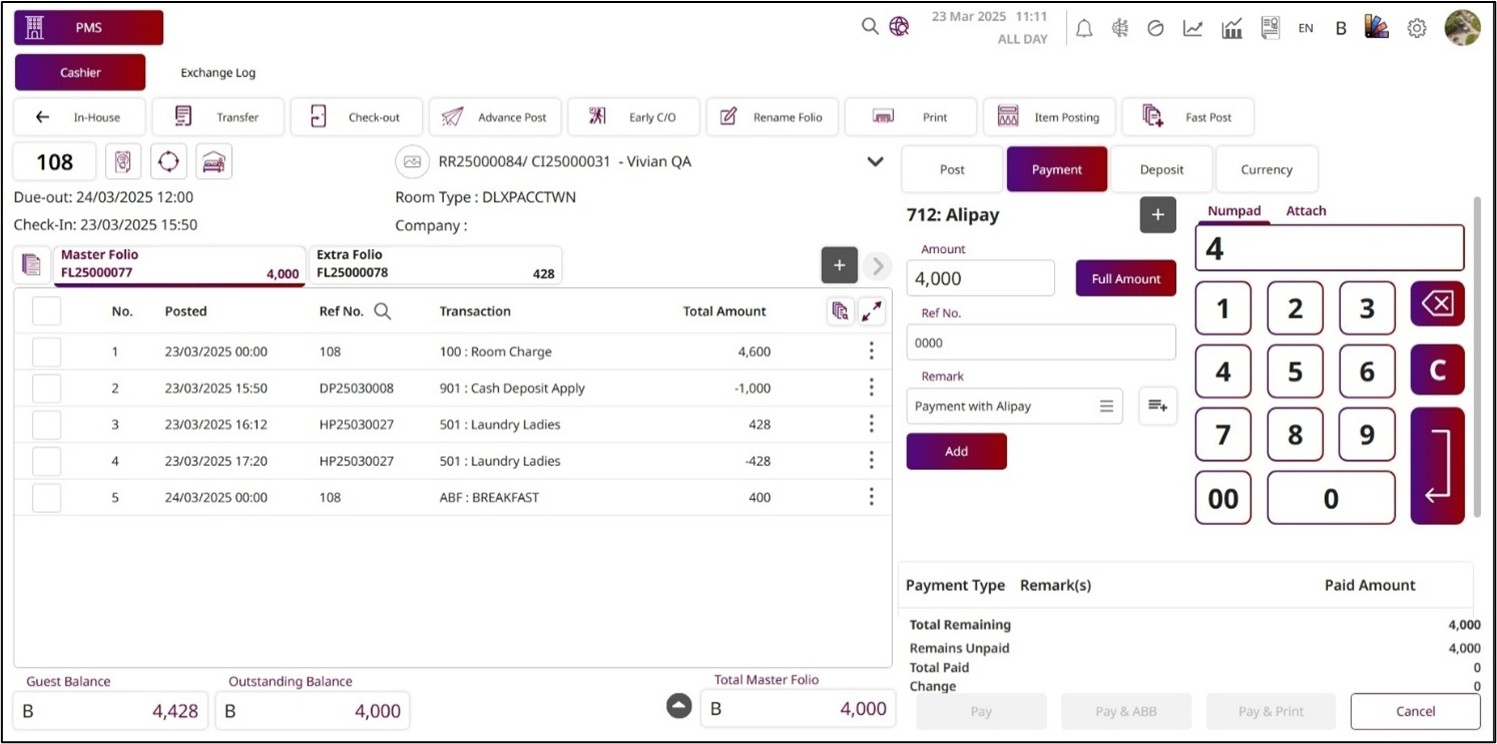
- Press Pay to save the payment process. If you press Pay & ABB , you will get an ABB and save the payment process. If you press Pay & Print , it will print the receipt immediately and save the payment process.
- Press Cancel to discard this process.
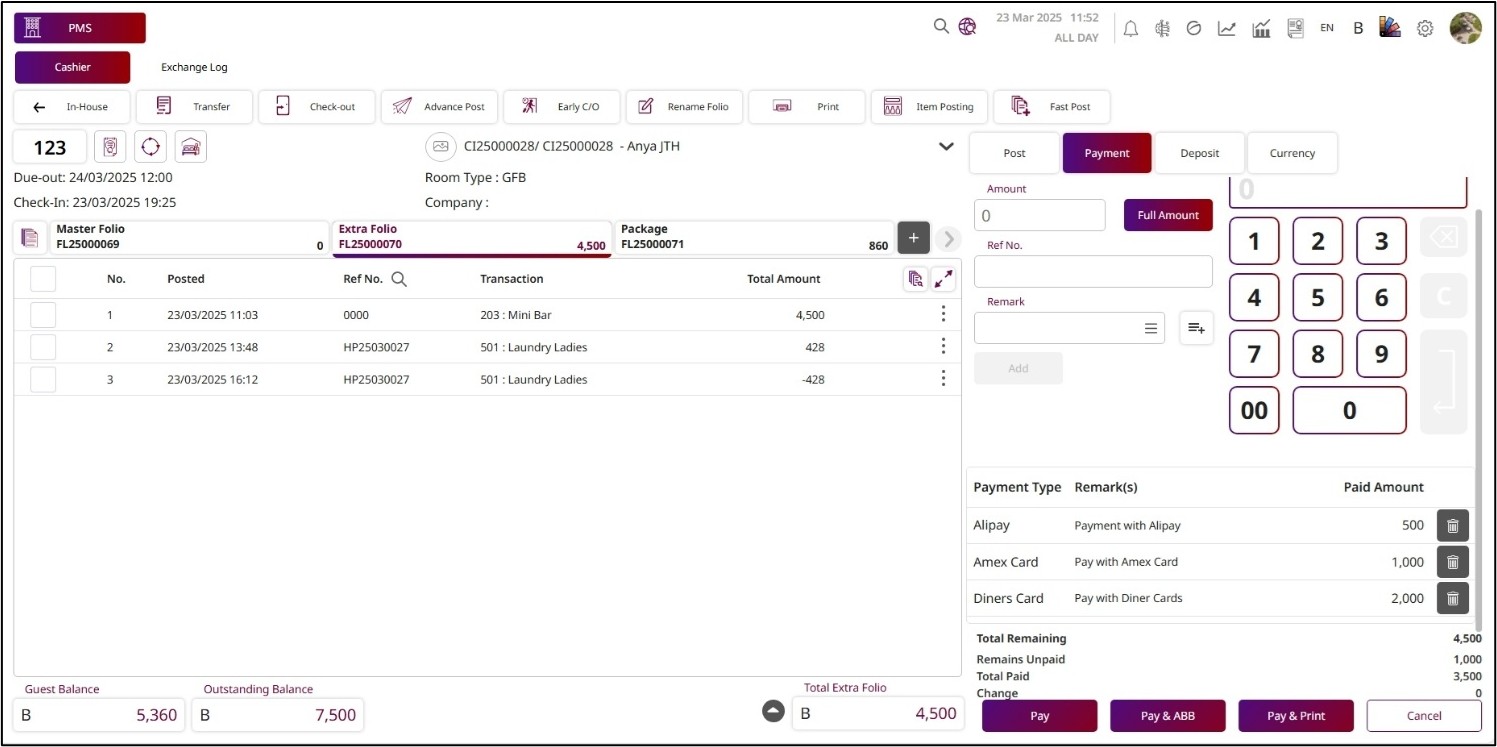
7.19 Multi Payment
This function is used to record a guest’s payment into their folio, directly managing financial transactions associated with the guest’s account in the hotel. It provides a systematic and organized way to record and manage payment information while supporting multiple payment types within the same function.
To perform the task:
- Press Payment.
- Press a payment type, and the payment function will be displayed on the right side.
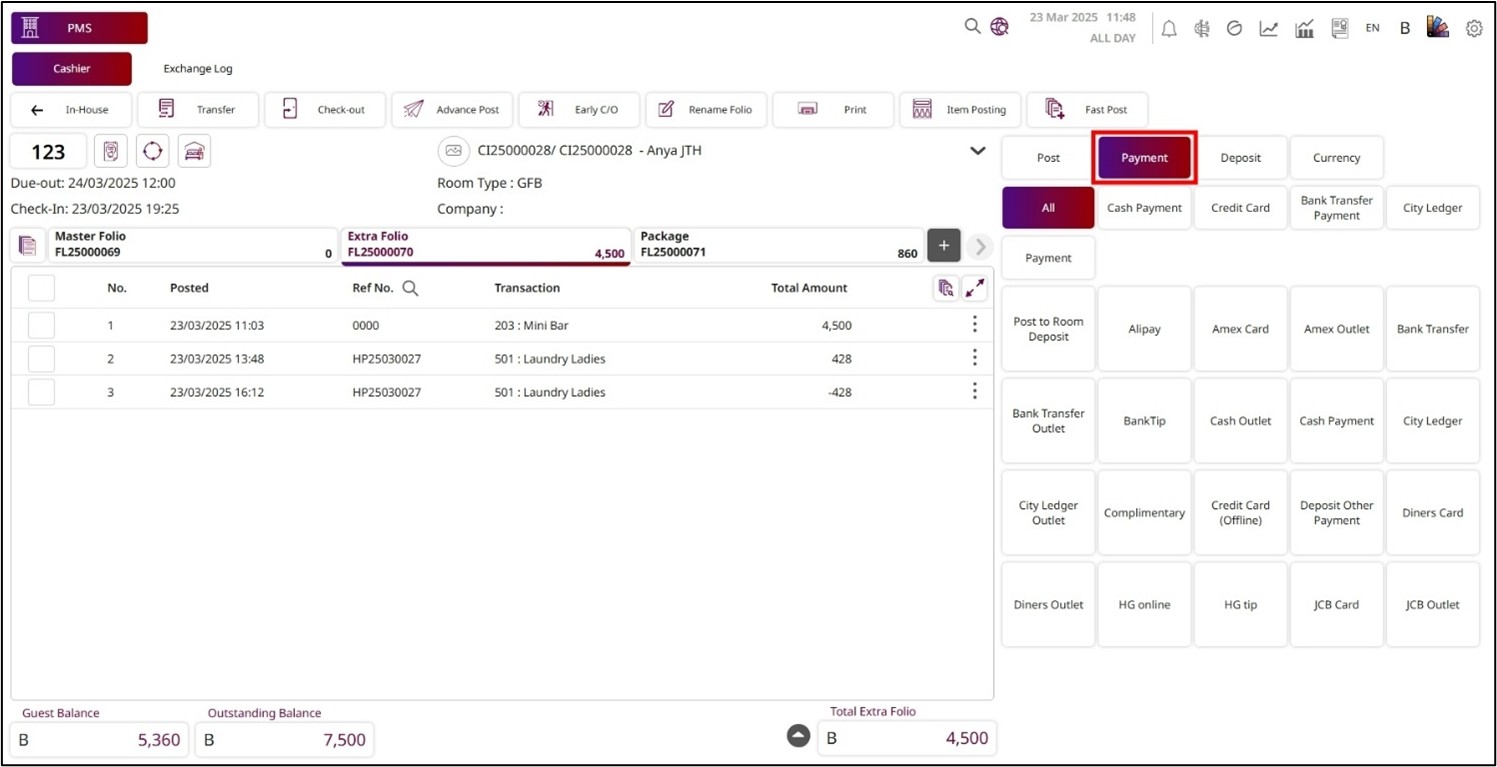
- Enter the Amount or press Full Amount , or you can use the numpad to fill it out.
- Enter the Reference No.
- Enter the Remark.
- Press Add , and the payment information will show the Payment Type, Remark, and Paid Amount.
- Press + to select another payment type, enter the Amount, and press Add again. You can add multiple payment types for one transaction/bill.

- Press Pay to save the payment process. If you press Pay & ABB , you will get an ABB and save the payment process. If you press Pay & Print , it will print the receipt immediately and save the payment process.
- Press Cancel to discard this process.
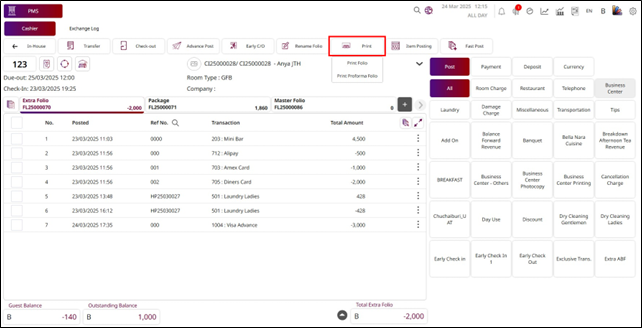
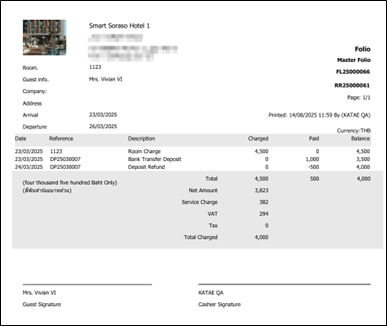
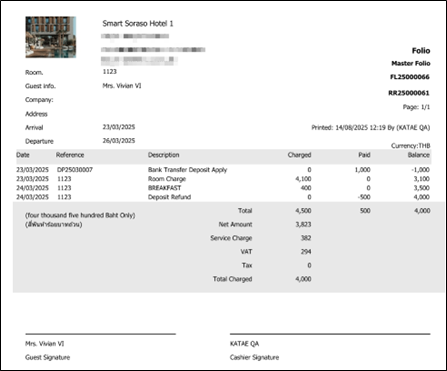
7.20 Print Folio
This function allows staff to view the folio and either print it or send it to the guest. It is commonly used at check-out or upon request to provide guests with a detailed statement of their charges and payments. Staff can also select specific details from the pop-up to include before printing or sending the folio.
To perform the task:
- Press Print from the top menu bar.
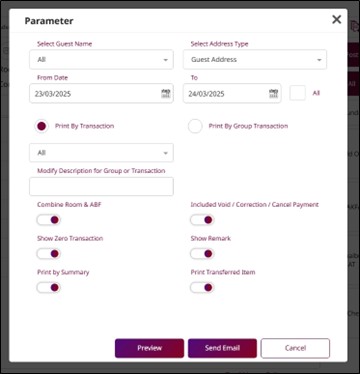
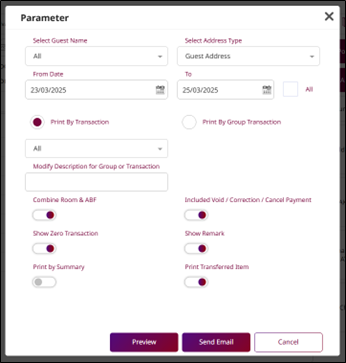
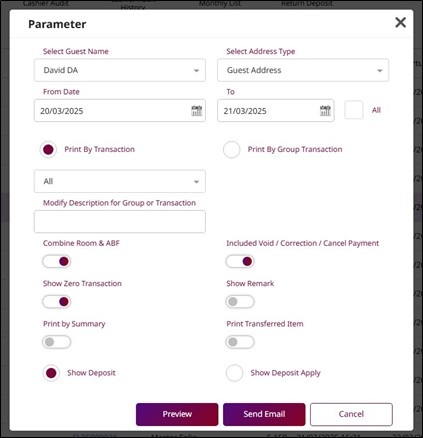
- Press Print Folio , and then the Parameter for Print Folio will be displayed.
- You can select any information to print the folio:
- Select Guest Name: It will default to All, but you can select any guest in this room.
- Select Address Type: Choose the address type to print.
- From Date / To Date: Select the date period to print. If you press All, you don't have to select a date period; it will print all dates.
- Press the radio button to select the Print Type: Print by Transaction or Print by Group Transaction.
- Enter the Modify Description for Group or Transaction: To describe the group or transaction.
- Enable the toggle Combine Room & ABF: To show Room Charge and Breakfast in one line.
- Enable the toggle Included Void / Correction / Cancel Payment: To show transactions that are already Void, Correction, or Cancel Payment.
- Enable the toggle Show Zero Transaction: To show transactions with zero value.
- Enable the toggle Show Remark: To show remarks for all transactions.
- Enable the toggle Print by Summary: To print the folio by summary.
- Enable the toggle Print Transferred Item: To print transfer transactions from other folios.
- Enable the toggle Show Deposit: To show the deposit transaction.
- Enable the toggle Show Deposit Apply: To show the deposit application.
- Press Preview to view the information in a PDF file.
- Press the Send Email button to send the folio via email.
- Press Cancel to close the Parameter pop-up.
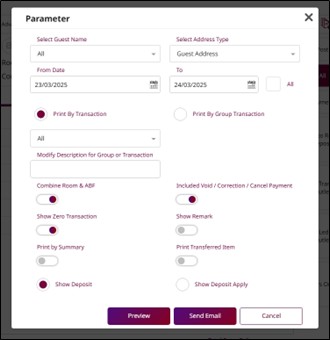
Note: Only choose the options that are necessary for your print requirements.
7.21 Print Performa Folio
This function allows staff to view a folio of transactions for a room based on the posting journal. It is typically used to generate a provisional statement of charges before finalizing the folio, allowing review and confirmation of all posted transactions.
To perform the task:
- Press Print from the top menu bar.
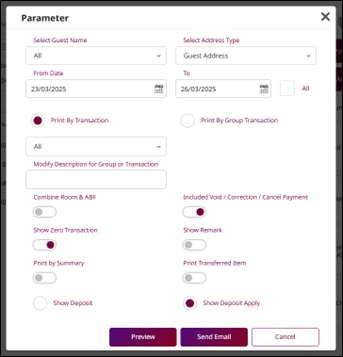
- Press Print Proforma Folio , and then the Parameter for Print Folio will be displayed.
- You can select any information to print the folio:
- Select Guest Name: It will default to All, but you can select any guest in this room.
- Select Address Type: Choose the address type to print.
- From Date / To Date: Select the date period to print. If you press All, you don't have to select a date period; it will print all dates.
- Press the radio button to select the Print Type: Print by Transaction or Print by Group Transaction.
- Enter the Modify Description for Group or Transaction: To describe the group or transaction.
- Enable the toggle Combine Room & ABF: To show Room Charge and Breakfast in one line.
- Enable the toggle Included Void / Correction / Cancel Payment: To show transactions that are already Void, Correction, or Cancel Payment.
- Enable the toggle Show Zero Transaction: To show transactions with zero value.
- Enable the toggle Show Remark: To show remarks for all transactions.
- Enable the toggle Print by Summary: To print the folio by summary.
- Enable the toggle Print Transferred Item: To print transfer transactions from other folios.
- Press Preview to view the information in a PDF file.
- Press the Send Email button to send the folio via email.
- Press Cancel to close the Parameter pop-up.

Note: A proforma folio is for review only and is not the final bill or official invoice. Finalize and verify transactions before issuing the official folio. Select only the options needed for printing.
7.22 Check Out 1 by 1 Folio and Send to E-Invoice
This function allows staff to check out an individual folio and send it to the e-invoice system. The folio must have a zero balance before checkout, meaning all transactions within it must be fully paid before the checkout process can be completed.
To perform the task:
- Select a folio that has a total of 0 , and the Close & Send button will be displayed.
- Press Close & Send.
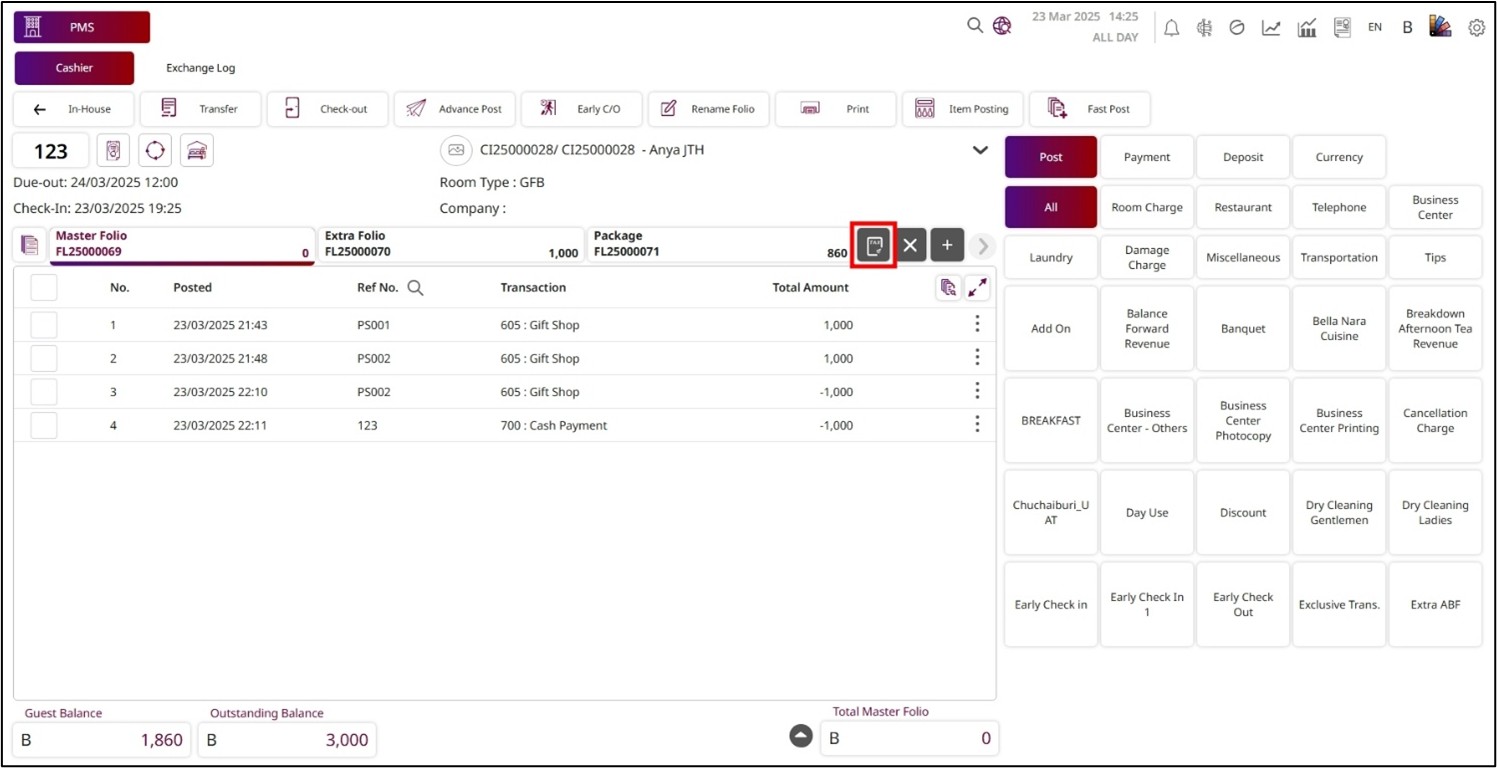
- The Post Invoice pop-up will be displayed with the following details:
- Document No .: Auto-generated and non-editable invoice number.
- Doc Status : Indicates the status of the document (e.g., Prepare).
- RSVN. No .: The reservation number linked to the guest's stay.
- Room No .: The room number assigned to the guest.
- Arrival Date / Departure Date : Check-in and check-out dates.
- Guest Information : includes several fields essential for the invoice and guest details. The Company Code refers to the name of the company or booking source, while the Guest Name is the name of the guest. If applicable, the Tax ID refers to the guest or company's tax identification number, and the Tax Location specifies the tax location if it's different from the guest's address. Contact details such as Email / Telephone are required for the guest or company. The Address / Zip Code / City fields are used for the mailing address, postal code, and city. The Country field is a required field to select the guest's country. The Payment Method is another mandatory field, where the method of payment, such as TM/CK or Credit Card, is chosen. Finally, the Remark section allows for any additional notes or remarks regarding the guest's stay or transaction.
- Transaction List : This section shows all posted items and charges.
- Press Post Invoice to confirm and finalize the invoice. Once posted, the invoice will be recorded in the system.
- Press Cancel to close the screen and discard the process.
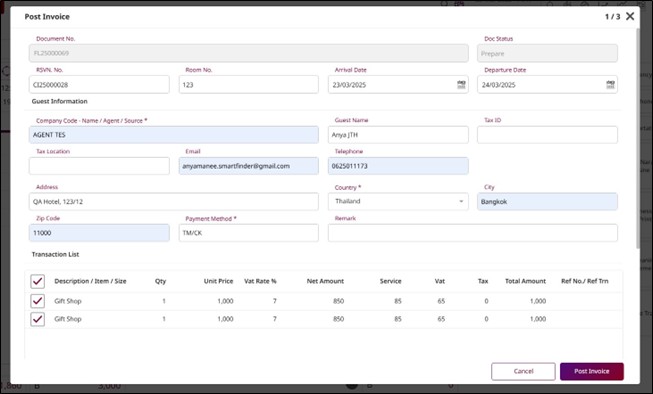
Note: The folio must have a zero balance for the system to display the Close & Send button.
8. Check Out Room/Group
Available under Cashier > Room List > Group Due Out , this function allows staff to check out multiple rooms under the same group code in one action. It streamlines balance settlement, charge management, and document issuance for the entire group, eliminating the need to close rooms individually. This helps save time, reduce errors, and ensure all group transactions are finalized together.
To perform the task:
- Press the Select & Go icon button on the group under Group Due Out.
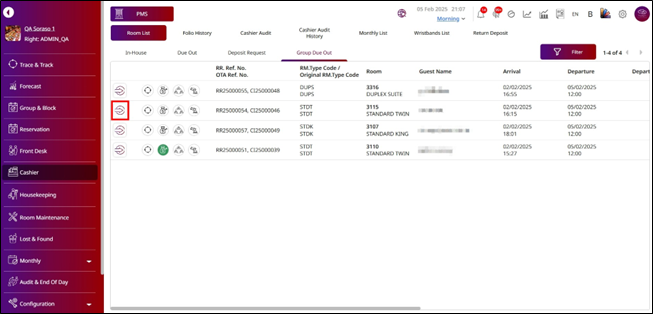
- The system will display the Group Information , which cannot be edited on this page:
- Check-in: The check-in date of this group.
- Time: The check-in time of this group.
- Check-out: The check-out date of this group.
- Time: The check-out time of this group.
- Group Code: The group codes.
- Group Name: The name of the group.
- Name/Contract: The contract used for this group.
- Reference No.: The reference number of this group booking.
- Status: The status of this group.
- Night(s): Total nights of the group booking.
- The Room List in the group:
- If a room has a 0 Folio Balance, the Check-out button will be displayed.
- If the balance is not zero, the Pay Now button will be displayed.
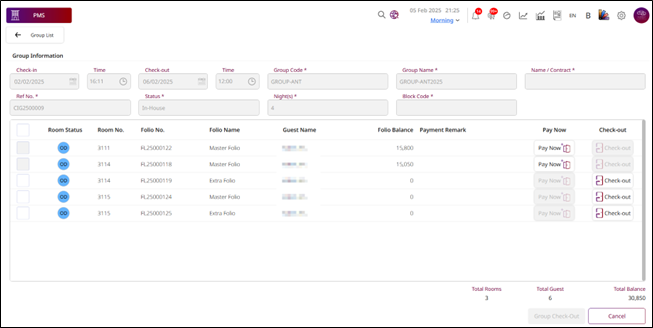
- Pressing the Pay Now button will take you to the Cashier page, where you must pay all outstanding transactions.
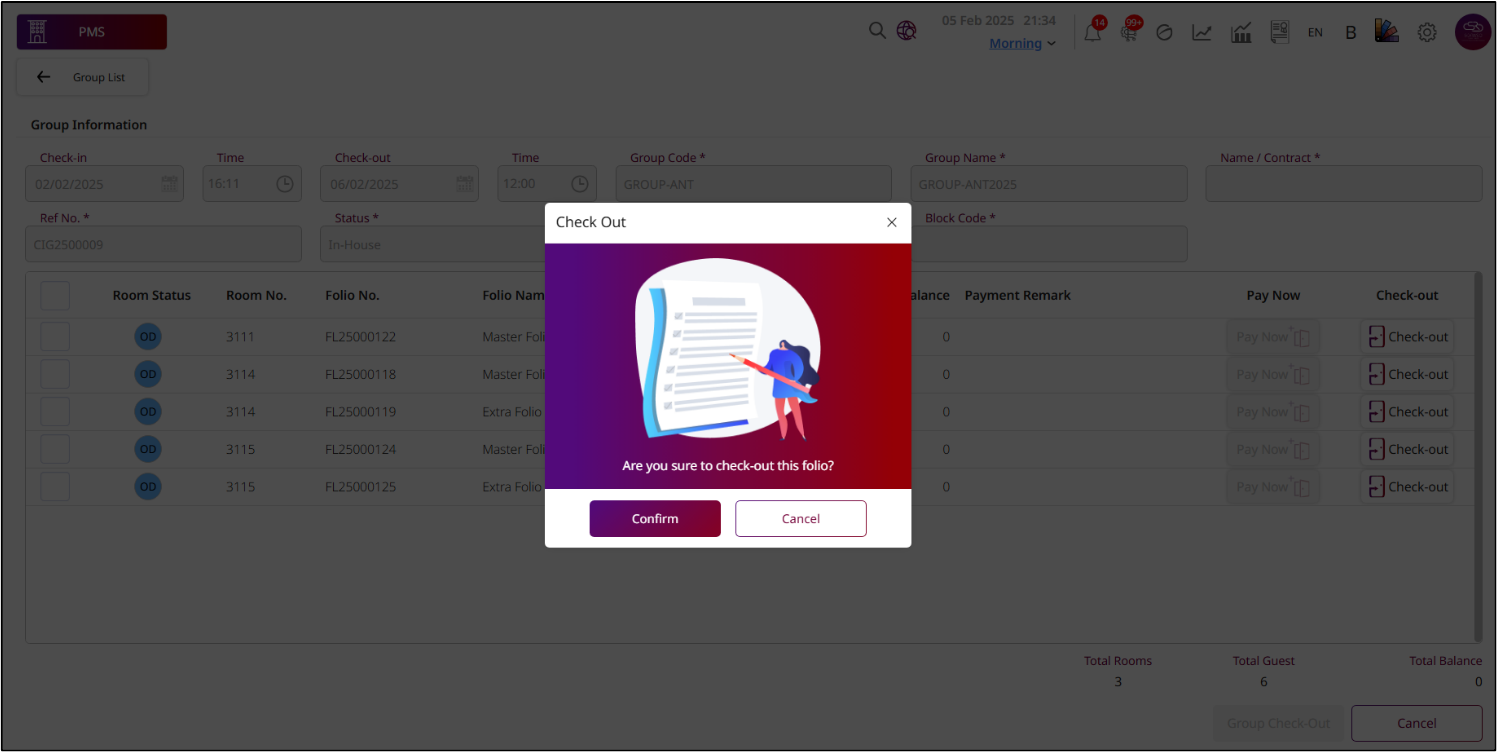
- Pressing the Check-out button for a room will display a Confirm Check-out pop-up:
- Press Confirm to check out this room.
- Press Cancel to close the pop-up and discard the room check-out process.
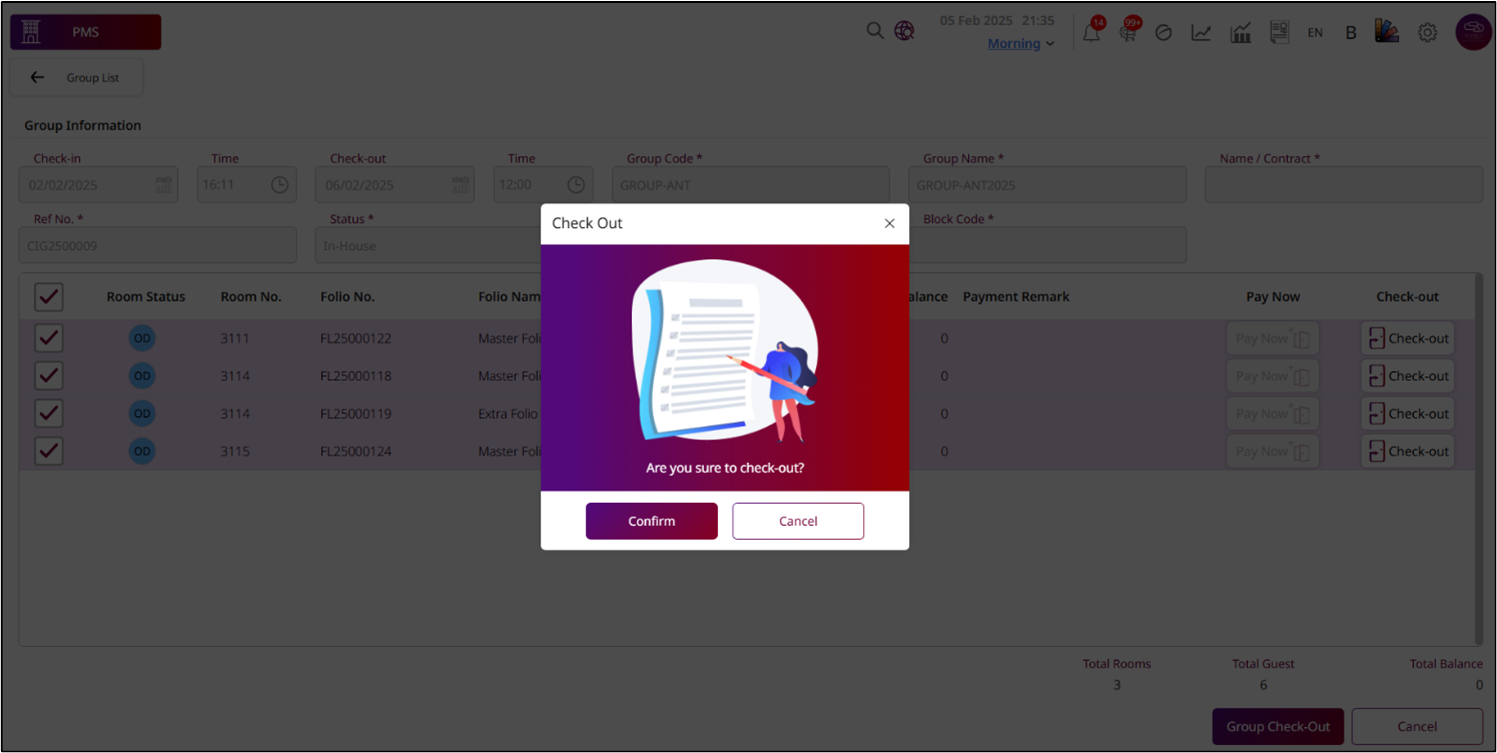
- Press Select All and then Group Check-Out to check out all rooms in this group.
- The Confirm Check-out pop-up will appear:
- Press Confirm to check out all rooms in the group.
- Press Cancel to discard the process.
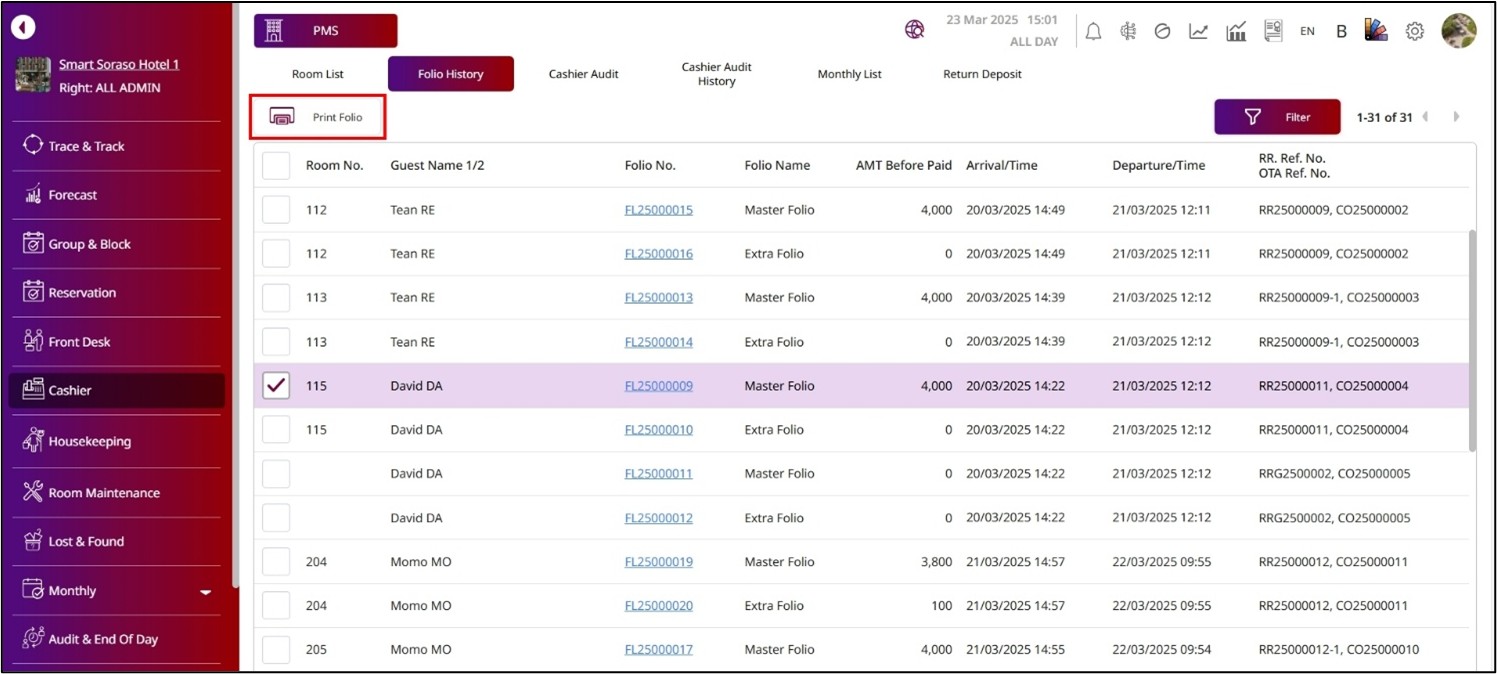
9. Re-Print Folio After Check Out
Available under Cashier > Folio History , this function allows staff to reprint a guest’s folio after the check-out process has been completed. It is commonly used to provide an additional copy to the guest or for internal record-keeping, displaying all finalized charges and payments as of the check-out time.
To perform the task:
- Select a folio from the list of folio history.
- Press Print Folio , and the Parameter pop-up will be displayed.
- You can select any information to print the folio:
- Select Guest Name: It will default to All, but you can select any guest in this room.
- Select Address Type: Choose the address type to print.
- From Date / To Date: Select the date period to print. If you press All, you don't have to select a date period; it will print all dates.
- Press the radio button to select the Print Type: Print by Transaction or Print by Group Transaction.
- Enter the Modify Description for Group or Transaction: To describe the group or transaction.
- Enable the toggle Combine Room & ABF: To show Room Charge and Breakfast in one line.
- Enable the toggle Included Void / Correction / Cancel Payment: To show transactions that are already Void, Correction, or Cancel Payment.
- Enable the toggle Show Zero Transaction: To show transactions with zero value.
- Enable the toggle Show Remark: To show remarks for all transactions.
- Enable the toggle Print by Summary: To print the folio by summary.
- Enable the toggle Print Transferred Item: To print transfer transactions from other folios.
- Enable the toggle Show Deposit: To show the deposit transaction.
- Enable the toggle Show Deposit Apply: To show the deposit application.
- Press Preview to view the information in a PDF file.
- Press the Send Email button to send the folio via email.
- Press Cancel to close the Parameter pop-up.
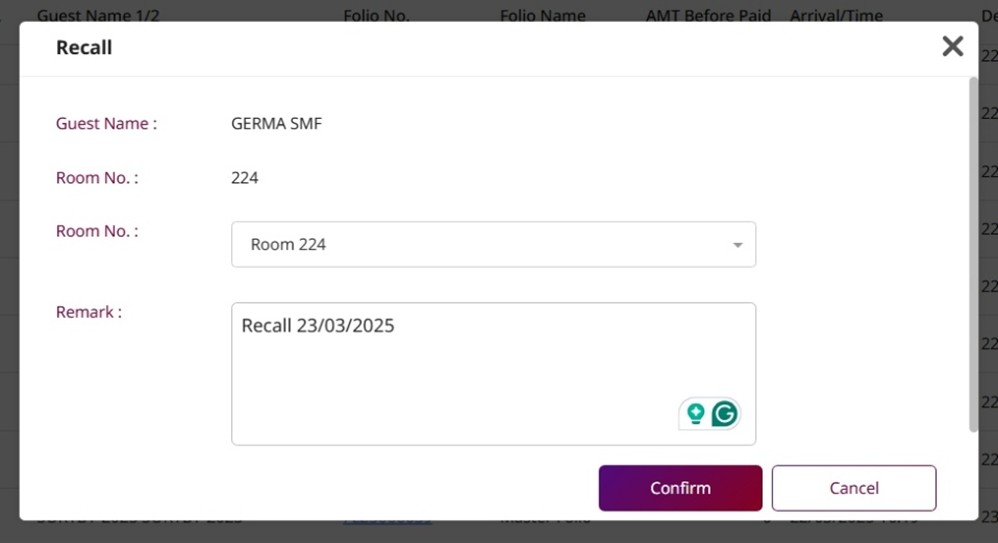
10. Recall Check Out
Available under Cashier > Folio History , this function allows staff to recall a folio that has already been checked out, provided the check-out occurred on the same day. It is particularly useful for making corrections or adjustments before the day’s transactions are finalized.
To perform the task:
- Select a folio that you checked out today.
- Press Recall Check Out.
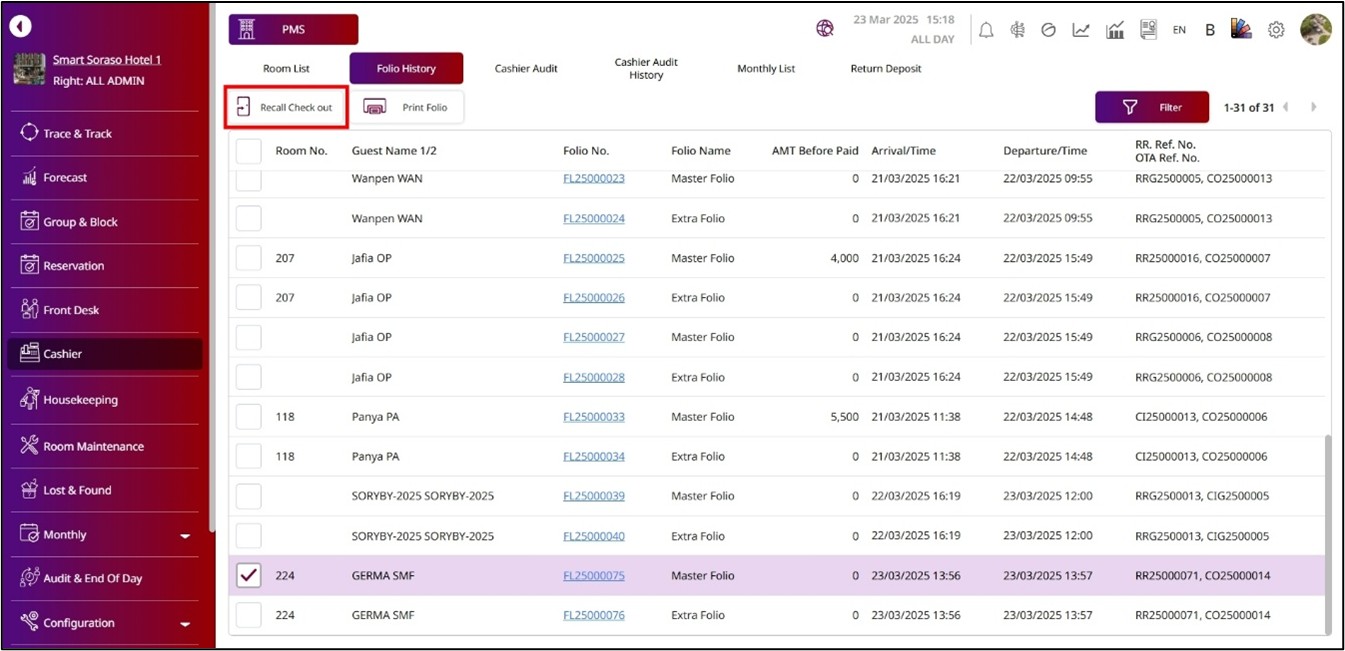
- The Recall pop-up will be displayed.
- Enter the Remark.
- Press Confirm to recall, and this room will change its status to In-House.
- Press Cancel to discard the process.